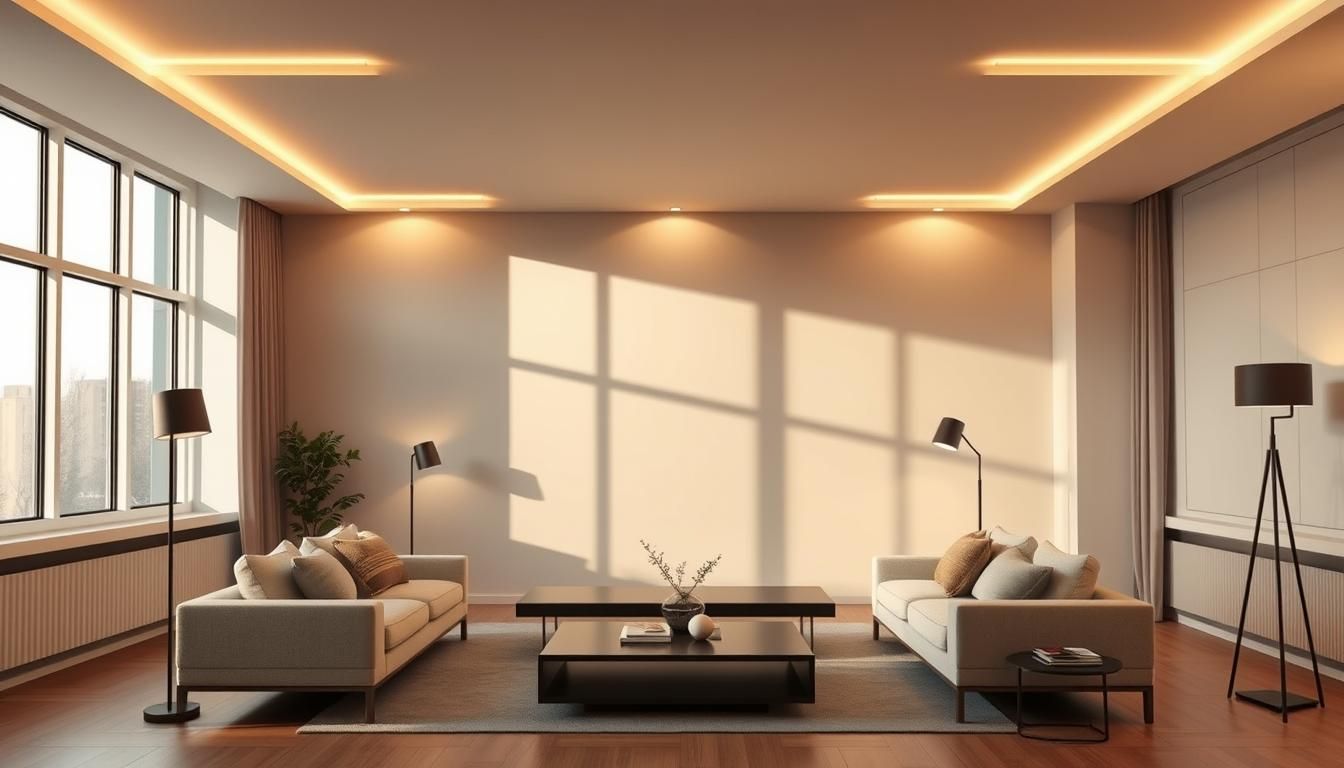
I still remember the evening I walked into my dim kitchen after a long day and wished the lights would just know what I needed.
That simple wish is exactly what modern smart lighting remodels deliver: easy app and voice control, color and brightness you can tailor, and schedules that fit your life. These upgrades blend design and technology to make your home feel calmer and more capable. Bob Vila provides comprehensive guides on planning and installing smart lighting systems.
In this guide you’ll learn how to plan zones, choose between bulbs, switches, and fixtures, and set automations that match how you use each space. Expect practical tips on costs (bulbs roughly $20–$50, hubs around $60), common bulb types like A19 and BR30, and simple add-ons such as smart plugs to convert lamps. For related solutions, explore comprehensive smart home integration.
Safety matters: replacing switches or outlets should be done by a licensed electrical contractor for code-compliant results. Along the way, you’ll see how circadian color ranges (2700K–6500K) and LED savings can improve comfort, focus, and sleep while cutting energy use. For related solutions, explore accent wall highlighting techniques.
Key Takeaways
- Modern systems combine design and technology for a better home experience.
- Plan zones, pick platforms, and choose bulbs, switches, or fixtures for each space.
- Costs start small—bulbs $20–$50, hubs about $60—and you can expand over time.
- LEDs, scenes, and schedules save energy and support circadian comfort.
- Hire a licensed electrician for switch or outlet work to ensure safety and code compliance. For related solutions, explore wallpaper and lighting combinations.
Why Smart Lighting Remodels Are Worth It Today
Today’s upgrades turn ordinary fixtures into automated helpers that save time and add safety to daily life.
Convenience, security, and energy savings arrive together. You can adjust lights from anywhere, set schedules to match sunrise and sunset, or use motion sensors that flip lights on only when someone is present.
That means less wasted electricity and fewer minutes spent toggling switches. LEDs in these systems use roughly 75% less energy than old incandescent bulbs, and dimming plus occupancy sensing cuts waste further.
Practical benefits for busy households
Vacation-mode schedules mimic presence for better security, and motion-triggered entryway lights deter intruders while saving power. Voice commands or app control let you change scenes for different activities — bright for early mornings, cozy for evenings.
| Quick Win | Why It Helps | Where to Start |
|---|---|---|
| Occupancy sensors | Turn off unused lights automatically | Hallways, closets, garages |
| Sunrise/sunset schedules | Adjusts lights with natural rhythm | Outdoor and entry lights |
| Smart LEDs | Lower energy bills and long life | Living room and kitchen |
For many homeowners, this is an affordable first project that scales. Start with a few bulbs and a basic app, then grow into whole-home systems as needed. The result is more control, less waste, and real peace of mind.
Understanding Smart Lighting: How It Works and What It Can Do
Connected lighting starts with how devices talk to each other.
Control comes from apps, voice, and simple automation rules. Use a smartphone app to set schedules or link to Alexa, Google Assistant, or Siri for voice commands. “Controlled remotely” can mean from your couch or from across town when your system is set up with cloud access.
!smart lighting
How systems connect
Wi‑Fi bulbs join your home network directly and are easy for small setups. Zigbee uses a hub to create a mesh that is more reliable with many devices. Bluetooth works well for short-range control without a hub.
An everyday example
Group three A19 bulbs and a motion sensor in a hallway. Create a routine that turns those lights on dim at night and off after two minutes of no motion. The result: no switches, less fumbling, and safer paths after dark.
| Connection | Best for | Notes |
|---|---|---|
| Wi‑Fi | Small installs, direct app control | Simple setup, depends on router strength |
| Zigbee | Many devices, whole-home scale | Hub improves latency and reliability |
| Bluetooth | Single rooms, local control | Short range, no hub required |
Most systems support dimming and color control and can run circadian schedules for better sleep and focus. Match the communication method to your home layout and the number of devices you plan to add over time. The Kitchn offers practical insights on integrating smart lighting into different rooms and spaces.
Set Your Goals: Plan by Activities, Rooms, and Different Moods
Think about how you use each room hour by hour, then design light layers that match those routines.
Map lighting zones for general, task, and accent needs
Start with your daily activities — cooking, reading, relaxing, and entertaining. Create zones for ambient (general), task, and accent light so each activity has the right illumination.
Group fixtures so a single tap or phrase controls a whole zone. Zones reduce wasted effort and make scenes more reliable across your home.
Design for specific spaces: kitchen, living, bedrooms, bathrooms
The kitchen needs bright prep zones and separate dimmable spots for dining. Living areas benefit from layered scenes for TV, gaming, and guests.
Bedrooms should offer soft, relaxing scenes for evening and brighter options for morning. Bathrooms require clear task light for grooming and safety.
Security-first planning for entryways, pathways, and garages
Prioritize front doors, side entries, garages, and paths. Motion sensors and schedules deter intruders and improve safety when you arrive home after dark.
| Zone | Primary Purpose | Example Rooms |
|---|---|---|
| Ambient | General visibility and mood | Living room, open-plan space |
| Task | Focused work and detail | Kitchen prep, bathroom vanity |
| Accent | Highlight and style | Artwork, shelving, dining nook |
| Security | Safety and deterrence | Entryways, pathways, garage |
Use a short checklist of must-have scenes like “Dinner,” “Wind Down,” and “Welcome Home.” For more on practical principles, see lighting design basics.
Choosing Your Platform: Standalone, Hub-Based, or Integrated Systems
Picking the right platform shapes how easy it is to set up today and expand tomorrow.
Standalone Wi‑Fi bulbs are plug-and-play and great for quick wins. They work well in a condo or a small space and let you control lights from an app fast.
Hub-based systems (Zigbee or similar) add reliability as you add devices. A hub creates a mesh that keeps automations responsive in larger homes and reduces latency for many fixtures.
Integrated platforms tie your lights into thermostats, security, and entertainment. These options give whole-home coordination and smoother scene management when you want deeper functionality.
!choosing systems
Systems that allow growth and future upgrades
Choose systems that allow new rooms, fixtures, and scenes without replacing the core hub or account. Modular components save money down the road.
Compatibility with Google Assistant, Alexa, and Siri
Confirm voice compatibility so everyone in the house can control lights their way. Also check for firmware updates and local vs cloud control to protect reliability and security.
- Match design elements like dimmers and wall controls to your decor.
- Prioritize stable automations, color accuracy, and strong scene tools for the kitchen and living areas.
Smart Bulbs vs Smart Switches vs Fixtures: What to Use Where
The best approach pairs devices to purpose: bulbs for color and scenes, switches for whole-circuit control, and fixtures when you want a built-in, polished result.
Bulbs are plug-and-play and come in A19, BR30, E12, and other shapes. They give dimmable white, tunable white, or full color. Use bulbs when you want fine-grain color and individual scene control at the lamp level.
Switches control entire circuits and work well for multi-bulb fixtures and recessed lighting. They keep automations reliable and preserve wall-switch habits for family members. Hire a licensed electrical contractor for switch installation to meet code and ensure safe operation.
Fixtures and plugs round out the options. Smart fixtures add native dimming and clean design. Smart plugs convert table or floor lamps without rewiring. LED strips fit under cabinets, behind a TV, or for island accents in the kitchen.
| Use | Best for | Notes |
|---|---|---|
| Bulbs | Color scenes, single lamps | Great for accent lights and mood control |
| Switches | Multi-bulb circuits, recessed lighting | One control point for many lights; pro install advised |
| Fixtures / Plugs | Integrated style, lamp conversions | Fixtures: built-in features. Plugs: quick, no-wiring wins |
- Consider the room: the kitchen often needs switches for cans and strips for task/accent lighting.
- Match features and systems so bulbs, switches, and fixtures work together in shared scenes.
- Mix options to get both expressive color and robust control without extra complexity in your home.
Designing Light Quality: Color Temperature, Intensity, and Scenes
Color and intensity tune a room to its role, from morning focus to evening calm.
Translate Kelvin terms into plain language: warm 2700K–3000K feels cozy for evenings, 4000K gives neutral clarity, and 5000K–5700K delivers cool task intensity. These ranges cover most home needs and make choices easier when you pick bulbs or fixtures.
Practical circadian and scene tips
Use circadian schedules that brighten and cool during the day, then dim and warm at night to support sleep and focus. Program a few core scenes—“Focus,” “Relax,” and “Dinner”—so different moods stay consistent across rooms.
In the kitchen, set cooler, brighter tones for prep and switch to warmer, lower intensity for evening meals and late-night snacks. Bathrooms can be brighter and cooler for readability while bedrooms trend warmer and dimmer for winding down.
- One-tap transitions: tune both temperature and intensity with a single scene change.
- Voice shortcuts: add quick phrases to switch scenes when your hands are full.
- Accents: keep white tuning as the backbone and use color-capable bulbs for highlights.
Test presets at different times of day and save favorites in your app. Well-designed light quality improves how spaces feel and function without adding visual clutter, giving your home a better, more usable experience.
Step-by-Step: Your Smart Lighting Remodel Roadmap
Start with a simple walkthrough to turn ideas into a clear, staged plan.
Audit spaces first. Walk every room and note fixtures, entryways, stairs, and safety priorities. Mark kitchen task zones, living room scenes, bedrooms, bathrooms, hallways, and outdoor areas. This small step saves time and money later.
Define zones and control methods. Decide which areas use an app, which need voice, and which keep physical switches. Make routines easy for everyone in the home by matching controls to daily habits.
Build a phased plan that scales. Start with high-impact areas: kitchen under-cabinet strips and foyer, then add bulbs and plugs in living areas. Phase 2 can add smart switches for multi-bulb circuits. Phase 3 brings a hub or integrated systems for whole-home reliability.
Program automations and sensors. Use motion in hallways and occupancy shutoffs to save energy. Sync sunrise/sunset schedules for exterior and common areas. Test scenes from your smartphone app, then add voice phrases for hands-free control.
| Step | Focus | Example |
|---|---|---|
| Audit | Priority zones and safety | Entryway, stairs, kitchen prep |
| Phase 1 | Quick wins | Bulbs, plugs, under-cabinet strips |
| Phase 2 | Circuit control | Smart switches for recessed cans |
| Phase 3 | Scale and reliability | Hub integration, whole-home scenes |
Keep a change log. Record features you enable—dimming limits, motion sensitivity, overnight scenes—and revisit the plan quarterly to add rooms or enhancements without overwhelming the system.
Installation and Safety: When to DIY and When to Hire a Pro
Before you flip a switch or pull a wire, know which upgrades are safe to tackle yourself and which need a pro.
Easy, low-risk updates: Replace bulbs and plug in LED strips to modernize a room fast. These devices are plug-and-play and usually don’t alter wiring.
!installation and safety Bring in a licensed electrical contractor for hardwired work. Smart switches and receptacles must be installed to code. They keep circuits energized so automations and app control work reliably across a circuit.
- For recessed lighting on multi-bulb circuits, switches offer unified control and simpler use for homeowners.
- Outdoor fixtures must be rated for wet or damp locations—confirm the weather rating before install.
- Update device firmware after installation to maintain security and reliability.
| Item | DIY? | Notes |
|---|---|---|
| Bulbs and LED strips | Yes | Quick wins; no wiring changes |
| Switches and outlets | No | Hardwired; pro install, permits may apply |
| Outdoor fixtures | Depends | Must meet wet/damp ratings and local code |
Label breakers, document which switch controls each fixture, and test automations and motion sensors after the project. If you’re unsure whether to DIY or hire help, read guidance on when to take a project to a professional at when to hire a pro.
Integrating Smart Lighting with the Rest of Your Smart Home
Connecting lights to other systems turns separate gadgets into a single, useful setup.
Coordinate climate, security, and media so routines run with one tap or phrase. Link scenes to your thermostat so shades lower and lights dim during evening cool-downs. Tie locks to entryway lights so doors trigger a welcome glow.
Use app-based scenes for common activities like “Dinner,” “Homework,” and “Goodnight.” Add simple voice commands to run multi-room scenes when your hands are full in the kitchen.
Keep systems interoperable so new devices add value without breaking existing routines. Enable presence detection or geofencing for effortless welcome-home lighting. Review automations periodically to avoid conflicts and ensure consistent execution.
| Integration | Example | Benefit |
|---|---|---|
| Thermostat | Dim lights when shades close | Comfort and energy savings |
| Security | Turn on lights when a lock opens | Safer arrival and clear entry |
| Entertainment | Dampen lights for movie mode | Immersive viewing in living room |
For a practical guide to wiring scenes into a full upgrade, see Integrating smart lighting with your remodel.
Networking Essentials: Wi‑Fi Strength, Hubs, and Reliability
Plan your wireless and wired links so automations run without delay across floors and patios.
A strong network or a dedicated hub keeps your whole-home lighting reliable. Survey coverage and add a mesh system if signal drops on upper floors or in the yard. A single router often cannot handle many devices at once.
Ensuring coverage for whole-home control
Use a mesh Wi‑Fi setup to reach every room, garage, and patio. For larger homes, consider wired backhaul to prevent slowdowns during peak household use.
When you scale to many devices, add a Zigbee or similar hub. Hubs reduce latency and make scenes execute faster across multiple systems.
Firmware updates, cybersecurity basics, and stability
Keep apps, bulbs, switches, and hubs up to date for bug fixes and security patches. Use unique passwords, segment IoT gear on a separate network, and enable two-factor where possible.
- Test performance during busy hours to verify scenes run on time.
- Keep a clear naming scheme in your app and smartphone so troubleshooting is quick.
- Document SSIDs, device groups, and hub placement for future upgrades or provider changes.
Schedule quarterly checks to apply updates and confirm automations remain responsive as you add new elements. Good networking choices save energy and time while improving security and day-to-day use.
Room-by-Room Ideas to Elevate Design and Functionality
Designing per room makes it simple to match light quality to how you actually live.
Kitchen task lighting and motion strips
Bright prep lights and under-cabinet motion strips keep counters safe and usable. Use strips for late-night paths and a warm “Dinner” scene to soften the space.
Living areas and media scenes
In the living room, create scenes for TV and gaming that dim overhead lights and add bias or accent lights. These presets improve comfort and the viewing experience.
Bedrooms and wake-up routines
Set relaxed reading scenes with warm tones. Build a gentle wake-up routine that brightens slowly to match sleep cycles.
Kids’ rooms, bathrooms, hallways, and outdoors
Kids’ rooms benefit from dimmers for bedtime, cooler task lights for study, and playful accent strips. Bathrooms need neutral task lights at mirrors and softer ambient options for late-night visits.
Use motion sensors in halls and stairs to boost safety. Outdoors, choose weather-rated fixtures that shift intensity for gatherings and overnight security.
| Room | Primary Feature | Example Scenes |
|---|---|---|
| Kitchen | Under-cabinet motion strips + bright prep | Prep, Dinner, Night Path |
| Living room | Dim scenes + accent bias lights | Movie, Game, Entertain |
| Bedroom | Warm reading + gradual wake | Wind Down, Wake |
| Outdoor | Weather-rated fixtures + security ties | Gathering, Security |
Costs, Benefits, and Long-Term Value for Homeowners
A clear cost-benefit view helps homeowners plan phases and avoid surprise expenses.
Upfront costs vary: bulbs typically run $10–$50 each, hubs start around $60+, and integrated fixtures often begin near $100. Expect electrician fees for hardwired switches or outlet work if your project needs permits or rewiring.
Energy savings add up. LED-based systems use about 75% less energy than incandescent bulbs. Dimming, schedules, and motion sensors cut waste further, lowering bills and run time over years.
Durability helps too. Many bulbs rate 15,000+ hours, and firmware updates can improve functionality without replacing hardware.
Value beyond savings
Improved convenience, safety, and comfort raise daily quality of life. Vacation schedules and entryway automations boost security while you’re away. In the kitchen, combining switches for recessed cans with under-cabinet strips adds task performance and versatile scenes without a full rewire.
| Item | Typical Cost | Benefit |
|---|---|---|
| Bulbs | $10–$50 | Color, dimming, long life |
| Hub | $60+ | Reliability for many devices |
| Integrated fixtures | $100+ | Built-in features, polished look |
| Electrician (switches) | Varies; labor & permit | Safe, code-compliant install |
Plan in phases. Budget a staged upgrade so you capture immediate benefits while spreading cost and time. Small steps often deliver measurable energy savings and lasting property appeal.
Smart Lighting Project Cost Analysis and ROI
Understanding the financial investment helps homeowners make informed decisions and plan phased upgrades. Smart lighting costs vary dramatically based on scope, product choices, and installation complexity.
Entry-Level Smart Lighting Budget ($200-$800)
Starter packages typically include 6-10 smart bulbs, a basic hub, and a simple app interface. Expect to pay $15-$35 per bulb for quality LED options with dimming and color-changing capabilities.
DIY installation keeps labor costs minimal for plug-and-play bulbs and basic smart plugs. Most homeowners can complete entry-level installations in 2-4 hours using manufacturer apps and setup guides.
Immediate benefits include remote control, energy savings of 60-75% compared to incandescent bulbs, and basic automation features like sunrise/sunset scheduling.
Mid-Range Professional Installation ($1,500-$5,000)
Smart switches and dimmers require professional electrical work but control entire circuits efficiently. Licensed electrician labor costs $75-$150 per hour, with typical installations taking 4-8 hours.
Hub-based systems (Zigbee, Z-Wave) provide better reliability and response times for 15+ devices. Premium hubs cost $100-$300 but support advanced features like scene synchronization and integration with security systems.
Whole-room solutions might include recessed smart fixtures, under-cabinet LED strips, and integrated controls. Materials and labor for a kitchen remodel typically range $2,500-$4,500.
Premium Whole-Home Systems ($5,000-$25,000)
Professional design consultation costs $500-$1,500 but optimizes layouts, fixture selection, and control strategies. Lighting designers understand code requirements, energy efficiency, and architectural integration.
Integrated control systems connect lighting with HVAC, security, and entertainment systems. Central processors and professional programming add $3,000-$8,000 to project costs.
High-end fixtures with built-in smart features, architectural integration, and premium finishes can cost $200-$2,000 per fixture. Custom installations may require specialized mounting and wiring.
| Investment Level | Typical Cost | Professional Labor | Key Features |
|---|---|---|---|
| Entry DIY | $200-$800 | None required | Basic bulbs, simple app control |
| Mid-range | $1,500-$5,000 | 6-12 hours electrical | Smart switches, hub systems |
| Premium | $5,000-$25,000 | 20-40 hours design/install | Integrated controls, custom fixtures |
Energy Savings and Payback Calculations
LED efficiency gains provide immediate energy savings. A typical household replacing 20 incandescent bulbs saves $100-$200 annually on electricity costs.
Smart controls amplify savings through occupancy sensing, daylight harvesting, and optimized scheduling. Advanced systems can reduce lighting energy use by 20-40% beyond basic LED upgrades.
Utility rebates often offset 10-30% of smart lighting costs. Many regions offer incentives for ENERGY STAR certified products and professional installations meeting efficiency standards.
Advanced Smart Lighting Technologies and Trends
Next-generation features are reshaping how homeowners interact with lighting systems. Understanding emerging technologies helps future-proof investments and identify upgrade opportunities.
Circadian Lighting and Health Benefits
Human-centric lighting automatically adjusts color temperature throughout the day to support natural circadian rhythms. Morning light starts cool and bright (5000K-6500K), transitioning to warm (2200K-3000K) in evening hours.
Research-backed benefits include improved sleep quality, better mood regulation, and enhanced cognitive performance. Premium systems cost 20-40% more than standard smart lighting but offer measurable health improvements.
Programmable transitions gradually shift color and intensity to avoid jarring changes. Quality systems provide smooth transitions over 30-60 minute periods, mimicking natural sunrise and sunset patterns.
AI and Machine Learning Integration
Adaptive scheduling learns household routines and automatically adjusts lighting without manual programming. Systems track occupancy patterns, seasonal changes, and energy usage to optimize performance.
Predictive automation anticipates needs based on calendar events, weather forecasts, and historical data. Advanced systems can pre-adjust lighting for expected activities or weather conditions.
Voice recognition improvements now distinguish between family members, allowing personalized responses to lighting commands. Individual preferences for brightness, color, and scenes can be automatically applied.
Professional Integration Services
Smart home consultants assess existing systems and recommend optimal integration strategies. Services typically cost $150-$300 per hour but prevent costly compatibility issues.
Network optimization ensures reliable performance across multiple smart devices. Professional network assessments ($300-$800) identify bandwidth limitations and recommend infrastructure upgrades.
Ongoing support contracts provide firmware updates, troubleshooting, and system expansion services. Annual contracts cost $200-$600 but maintain optimal performance as technology evolves.
Room-by-Room Implementation Strategies
Tailored approaches maximize benefits while managing costs and complexity. Each space has unique requirements for lighting control, energy efficiency, and user experience.
Kitchen Lighting Command Center
Task lighting automation uses occupancy sensors to provide bright work illumination when needed. Under-cabinet LED strips with motion activation eliminate manual switching during food preparation.
Dining scene integration smoothly transitions from bright cooking modes to warm dining ambiance. Smart dimmers coordinate overhead fixtures, pendant lights, and accent lighting for entertaining.
Voice control optimization proves especially valuable in kitchens where hands are often occupied. Waterproof smart switches and voice assistants resistant to steam and splashing ensure reliable operation.
Cost considerations: Kitchen smart lighting typically costs $800-$3,500 depending on fixture count and complexity. Professional installation ensures proper placement and code compliance near water sources.
Living Room Entertainment Integration
Media synchronization automatically dims lights during movie playback and gradually increases brightness during credits. Integration with streaming devices and sound systems creates immersive entertainment experiences.
Conversation lighting provides comfortable illumination for reading and socializing without glare or harsh shadows. Layered lighting with table lamps, floor fixtures, and recessed cans offers flexibility.
Accent lighting enhancement highlights artwork, architectural features, and plants through programmable color-changing options. LED strips behind TVs reduce eye strain and add visual drama.
Implementation budget: Living room upgrades range $600-$2,500 for comprehensive smart lighting with entertainment integration and multiple scene options.
Bedroom Sleep Optimization
Gradual wake-up lighting simulates natural sunrise to support healthy sleep cycles. Premium systems coordinate with sleep tracking devices and smart alarms for optimal timing.
Reading lighting control provides adjustable task illumination without disturbing sleeping partners. Bedside smart switches and individual reading lights with independent controls improve comfort.
Security integration connects bedroom lighting with door sensors and security systems for automatic activation during nighttime movements or security events.
Privacy considerations include local processing options that don’t require cloud connectivity for sensitive bedroom environments. Hardwired systems reduce wireless signal exposure concerns.
Bathroom Safety and Efficiency
Occupancy-based automation prevents lights from being left on while ensuring safety during nighttime visits. Smart motion sensors distinguish between brief visits and longer grooming sessions.
Mirror lighting optimization provides shadow-free illumination for grooming tasks through properly positioned LED strips or backlit mirrors. Color temperature adjustment helps with makeup application accuracy.
Humidity management coordinates exhaust fans with lighting controls to prevent moisture damage while maintaining comfort. Smart switches can override manual controls during high-humidity conditions.
Code compliance requirements vary by region but generally require GFCI protection and proper fixture ratings for wet locations. Professional installation ensures safety and warranty protection.
Outdoor Security and Landscape Integration
Motion detection systems provide security lighting while minimizing light pollution and energy waste. Smart sensors distinguish between humans, animals, and environmental triggers.
Weather-responsive automation adjusts scheduling based on sunrise/sunset times and weather conditions. Integration with weather services optimizes energy use and provides appropriate illumination.
Landscape accent lighting highlights gardens, pathways, and architectural features through low-voltage LED systems. Smart controls allow seasonal adjustments and special event programming.
Professional considerations: Outdoor installations require weatherproof fixtures, proper electrical protection, and compliance with local light ordinances. Expect 20-40% higher costs for quality weather-resistant components.
Troubleshooting and Maintenance Best Practices
Proactive maintenance protects investments and ensures optimal performance over time. Understanding common issues prevents minor problems from becoming expensive repairs.
Network Performance Optimization
Wi-Fi coverage assessment should be conducted annually to identify dead zones and interference sources. Mesh networks ($200-$600) often resolve connectivity issues in larger homes.
Device firmware updates require regular attention to maintain security and add new features. Set monthly reminders to check for updates across all smart lighting components.
Bandwidth management becomes critical with 15+ connected devices. Quality of Service (QoS) settings on routers prioritize critical devices and prevent network congestion.
Common Issues and Solutions
Connection dropouts often result from network congestion or outdated firmware. Solutions include dedicated IoT networks, mesh system upgrades, and regular device reboots.
Scene synchronization problems typically indicate hub overload or device compatibility issues. Dividing large scenes into smaller groups often resolves timing problems.
Voice command failures may result from poor microphone placement, background noise, or command phrasing issues. Training household members on effective voice commands improves success rates.
Professional Maintenance Services
Annual system checkups cost $150-$400 but identify performance issues, update configurations, and optimize energy savings. Professional reviews often recover system costs through improved efficiency.
Network security audits ensure smart home devices don’t create cybersecurity vulnerabilities. Professional assessments ($300-$800) include password updates, firmware checks, and network segmentation recommendations.
Expansion planning services help homeowners add new devices without disrupting existing systems. Professional consultation ($200-$500) prevents compatibility issues and ensures optimal performance.
Future-Proofing Your Smart Lighting Investment
Technology evolution requires strategic planning to protect current investments while enabling future upgrades. Understanding industry trends helps make wise purchasing decisions.
Platform Compatibility Considerations
Open standard protocols like Zigbee 3.0 and Matter/Thread ensure device compatibility across manufacturers. Proprietary systems may offer better integration but limit future options.
Hub vs. hubless systems each offer advantages. Hub-based systems provide better performance and local processing, while hubless options offer simpler setup and lower initial costs.
Cloud dependency assessment helps identify systems that continue functioning during internet outages. Local processing capabilities become increasingly important for reliability and privacy.
Technology Upgrade Pathways
Modular expansion strategies allow gradual system growth without replacing existing components. Choose platforms that support device additions without major reconfigurations.
Retrofit compatibility ensures new smart features can be added to existing fixtures. Standard switch boxes and neutral wire availability enable future smart switch installations.
Professional consultation timing should occur every 2-3 years to assess new technologies and optimization opportunities. Early adoption of proven technologies provides maximum benefit periods.
Investment Protection Strategies
Warranty considerations vary significantly between manufacturers. Premium brands often provide 3-5 year warranties compared to 1-2 years for budget options.
Documentation maintenance should include purchase receipts, installation records, and system configurations. Proper documentation facilitates warranty claims and system troubleshooting.
Phased replacement planning spreads costs over time while ensuring system reliability. Replace oldest components first and maintain compatibility during transition periods.
Conclusion
Strategic smart lighting implementation transforms homes through improved efficiency, convenience, and ambiance while protecting long-term value. Begin with high-impact areas like kitchens and living rooms where benefits are immediately apparent and usage patterns are well-established.
Invest in quality components and professional installation for hardwired elements while using DIY approaches for simple bulb replacements and plug-in solutions. Budget $200-$800 for entry-level systems, $1,500-$5,000 for professional mid-range installations, and $5,000-$25,000 for premium whole-home automation.
Prioritize platforms supporting open standards like Zigbee 3.0 and Matter for future compatibility. Focus on energy-efficient LED technology, reliable network infrastructure, and regular firmware updates to maintain optimal performance.
Plan for circadian lighting benefits, entertainment integration, and security features that enhance daily living. Document all installations, maintain warranties, and schedule annual system reviews to protect investments and identify upgrade opportunities.
The result is a more comfortable, efficient, and valuable home that adapts to changing needs while reducing energy consumption and improving quality of life for all occupants.
FAQ
What is a comprehensive smart lighting remodel and why choose it?
A basic remodel replaces traditional bulbs and switches with app- and voice-controlled fixtures, bulbs, or switches to add convenience, security, and energy savings. It’s a practical first home tech upgrade that improves functionality and can increase resale appeal without a full renovation.
How do app control, voice commands, and automation differ?
App control gives you remote access from a smartphone. Voice commands through Google Assistant, Alexa, or Siri let you adjust lights hands‑free. Automation runs schedules and triggers (like motion sensors) so scenes change automatically for routines, security, or energy management.
Which communication protocols should I consider: Wi‑Fi, Zigbee, or Bluetooth?
Wi‑Fi is simple for single-room setups and remote access. Zigbee and Z‑Wave use hubs and mesh networks for reliable whole‑home coverage and lower latency. Bluetooth suits small zones and low‑power devices. Choose based on home size, devices, and future expansion plans.
Should I use smart bulbs, switches, or fixtures in different rooms?
Use bulbs for color and scene control in lamps and single fixtures. Switches work best for multi‑fixture circuits and recessed lighting. Replace fixtures for design impact or outdoor durability. Combine options to balance cost, control, and aesthetics.
How do I plan lighting by activity and mood?
Map zones for general, task, and accent lighting. In kitchens prioritize bright task light for counters; in living rooms set dimmable scenes for TV and entertaining; use warmer tones for bedrooms to support sleep. Program scenes for common activities to make control effortless.
What are practical color temperature and intensity guidelines?
Aim for 2700K–3000K in living and bedrooms for warm, relaxing light. Use 3500K–4000K for kitchens and work areas where clarity matters. Higher intensities help tasks; lower levels create ambiance. Circadian-friendly schedules shift cooler daytime tones to warmer evening light.
Can I install smart products myself or do I need a pro?
Plug‑in bulbs, strips, and smart plugs are DIY‑friendly. Replacing switches, outlets, or hardwired fixtures often requires a licensed electrician for safety and code compliance. For major rewiring or recessed light changes, hire a professional.
How do I ensure reliable whole‑home coverage and security?
Strengthen Wi‑Fi with mesh routers or use a hubed protocol like Zigbee for mesh stability. Keep firmware updated, use strong passwords, and segment devices on a guest network to reduce risk. Regular updates improve performance and security.
How do I scale a system over time?
Start with high‑impact zones like the kitchen or entryway. Pick a platform that supports growth and integrates with assistants and other devices. Add motion sensors, dimmers, and scenes gradually to spread cost and minimize disruption.
What are common energy and maintenance benefits?
LEDs and dimming cut energy use; schedules reduce wasted on-time. Remote control helps you turn off forgotten lights. Maintenance is minimal: replace bulbs as needed and apply firmware updates for continued performance and compatibility.
How do I integrate lighting with thermostats, security, and entertainment?
Choose platforms and hubs that support major ecosystems like Google Home, Amazon Alexa, and Apple HomeKit. Create scenes that coordinate lights with thermostats and security routines—for example, a “goodnight” scene that locks doors, lowers temperature, and turns off lights.
What should I budget for an initial project?
Entry-level upgrades (bulbs, plugs) can cost a few hundred dollars. Replacing switches or fixtures and hiring an electrician raises costs. Factor in hubs, sensors, and any professional labor. Long‑term energy savings and added home value offset upfront expenses over time.
How much can I save on energy costs with smart lighting?
LED smart bulbs use 75-80% less energy than incandescent bulbs, saving $100-$200 annually for typical households. Smart controls add another 20-40% savings through occupancy sensing, daylight harvesting, and optimized scheduling. Total annual savings often range $150-$400 depending on home size and usage patterns.
What are the most important features for first-time smart lighting buyers?
Prioritize dimming capability, reliable wireless connectivity (Wi-Fi or Zigbee), compatibility with major voice assistants, and energy efficiency ratings. Look for brands offering good warranty support and regular firmware updates. Start with a few bulbs in high-use areas to test performance before expanding.
How do I choose between hub-based and hubless smart lighting systems?
Hubless systems connect directly to Wi-Fi and offer simpler setup but may experience latency with many devices. Hub-based systems provide better performance, local processing, and mesh network benefits but require additional hardware investment. Choose hubless for small installations (under 10 devices) and hub-based for whole-home systems.
What installation work requires professional electricians vs DIY?
DIY: Smart bulb replacements, plug-in smart switches, LED strip installation, and app setup. Professional required: Hardwired switch replacements, new fixture installations, circuits additions, and any work involving electrical panels. Always hire licensed electricians for safety and code compliance on hardwired components.
How do I optimize smart lighting for different times of day?
Program morning scenes with cool, bright light (4000K-6500K) to support alertness. Afternoon lighting should be neutral (3500K-4000K) for productivity. Evening scenes use warm light (2200K-3000K) to promote relaxation. Gradually transition between scenes over 30-60 minutes to support natural circadian rhythms.
What network requirements support reliable smart lighting performance?
Ensure strong Wi-Fi coverage in all lighting locations using mesh systems if needed. Dedicated 2.4GHz channels work best for most smart devices. For hub-based systems, place hubs centrally with minimal interference. Plan for 20-30% network capacity above current device count to accommodate future additions.
How do I integrate smart lighting with existing home automation systems?
Check compatibility with platforms like Amazon Alexa, Google Home, Apple HomeKit, or Samsung SmartThings before purchasing. Use common protocols like Zigbee 3.0 or the new Matter standard for broad compatibility. Professional integration services ($300-$800) can optimize complex multi-system setups.
What maintenance is required for smart lighting systems?
Monthly: Check for firmware updates and test voice commands. Quarterly: Clean fixtures and sensors, verify scene programming accuracy. Annually: Professional network assessment, security audit, and performance optimization. Replace LED bulbs every 10-15 years or as needed based on manufacturer ratings.
How can I future-proof my smart lighting investment?
Choose systems supporting open standards like Zigbee 3.0 and Matter for broad compatibility. Invest in quality hubs with local processing capabilities. Document all installations and maintain upgrade budgets for technology refresh cycles every 5-7 years. Focus on platforms with strong developer ecosystems and regular feature updates.