DIY accent walls have become one of the most popular home improvement trends, and for good reason. A well-executed accent wall can completely transform your living space without the expense and disruption of a full renovation. According to the National Association of Home Builders, accent walls are the most popular DIY project, with 67% of homeowners choosing them as their first major room update. Whether you’re looking to create a stunning bedroom accent wall behind your headboard or add drama to your living room with wood accent wall treatments, the possibilities are endless.
I still remember the first time I painted one bold stripe behind my sofa. That single change made the whole room feel like mine. It was fast, affordable, and surprisingly transformative. Since then, I’ve experimented with everything from peel-and-stick wallpaper accent walls to intricate wood panel designs.
Modern accent wall ideas go far beyond simple paint colors. Pinterest reports a 156% increase in accent wall searches, with geometric patterns and natural materials leading trends. Today’s DIY enthusiasts are creating feature wall designs using creative wall treatments that include textured compounds, geometric patterns, natural materials, and innovative wallpaper applications.
This comprehensive guide covers over 15 different DIY accent wall treatments, complete with detailed tutorials, material costs, and room-specific recommendations. You’ll discover trending techniques for creating stunning accent walls in bedrooms, living rooms, and other spaces throughout your home.
For additional design inspiration, explore our minimalist entryway design ideas and plant-integrated interior concepts.
Looking for sustainable wall options? Check out our sustainable material sourcing and recycled tile accents guides.
Key Takeaways
- Accent walls are the most cost-effective way to transform any room - typically costing $50-$300 vs. $1,500+ for full room renovations
- Paint accent walls deliver the fastest results (4-6 hours), while wood accent walls create the most dramatic impact
- Bedroom accent walls work best behind headboards, while living room accent walls shine behind sofas or entertainment centers
- Modern techniques like geometric patterns, textured compounds, and mixed materials are trending in 2025
- Proper preparation (measuring, stud finding, material testing) ensures professional-looking results
- Most DIY accent wall projects can be completed in a single weekend with basic tools
- Peel-and-stick wallpaper offers commitment-free options perfect for renters and style experimenters
Why Accent Walls Are Essential in Modern Interior Design
In today’s design landscape, accent walls have evolved from simple painted surfaces to sophisticated architectural features. The psychology of interior design shows that the human eye naturally seeks focal points, and a well-designed accent wall satisfies this visual need while creating spatial hierarchy.
Accent walls solve multiple design challenges simultaneously. They add depth to flat spaces, create visual interest in minimalist rooms, and help define zones in open-concept layouts. More importantly, they allow homeowners to experiment with bold design choices without overwhelming the entire space.
For more room transformations, see our budget bathroom upgrades and reading nook ideas.
The Science Behind Accent Wall Success
Modern accent wall ideas work because they leverage several design principles:
- Contrast Creation: The brain processes visual differences faster than similarities, making accent walls natural attention magnets
- Scale Balance: A single bold wall balances furniture groupings and architectural elements
- Color Psychology: Strategic color placement can make rooms feel larger, cozier, or more energetic
- Texture Interest: Three-dimensional surfaces create shadow play that adds sophistication
Room-Specific Accent Wall Guidelines
| Room Type | Best Placement | Contrast Level | Popular Treatments |
|---|---|---|---|
| Small Bedrooms | Behind headboard | Low-Medium | Soft geometric patterns, subtle textures |
| Large Bedrooms | Headboard wall or opposite wall | Medium-High | Bold colors, wood treatments, wallpaper |
| Living Rooms | Behind sofa or entertainment center | Medium-High | Mixed materials, dimensional panels |
| Dining Rooms | Behind buffet/server | High | Dramatic wallpapers, rich colors |
| Home Offices | Behind desk | Medium | Motivating colors, textured surfaces |
| Entryways | First wall visitors see | High | Statement wallpapers, bold colors |
Current Accent Wall Trends for 2025
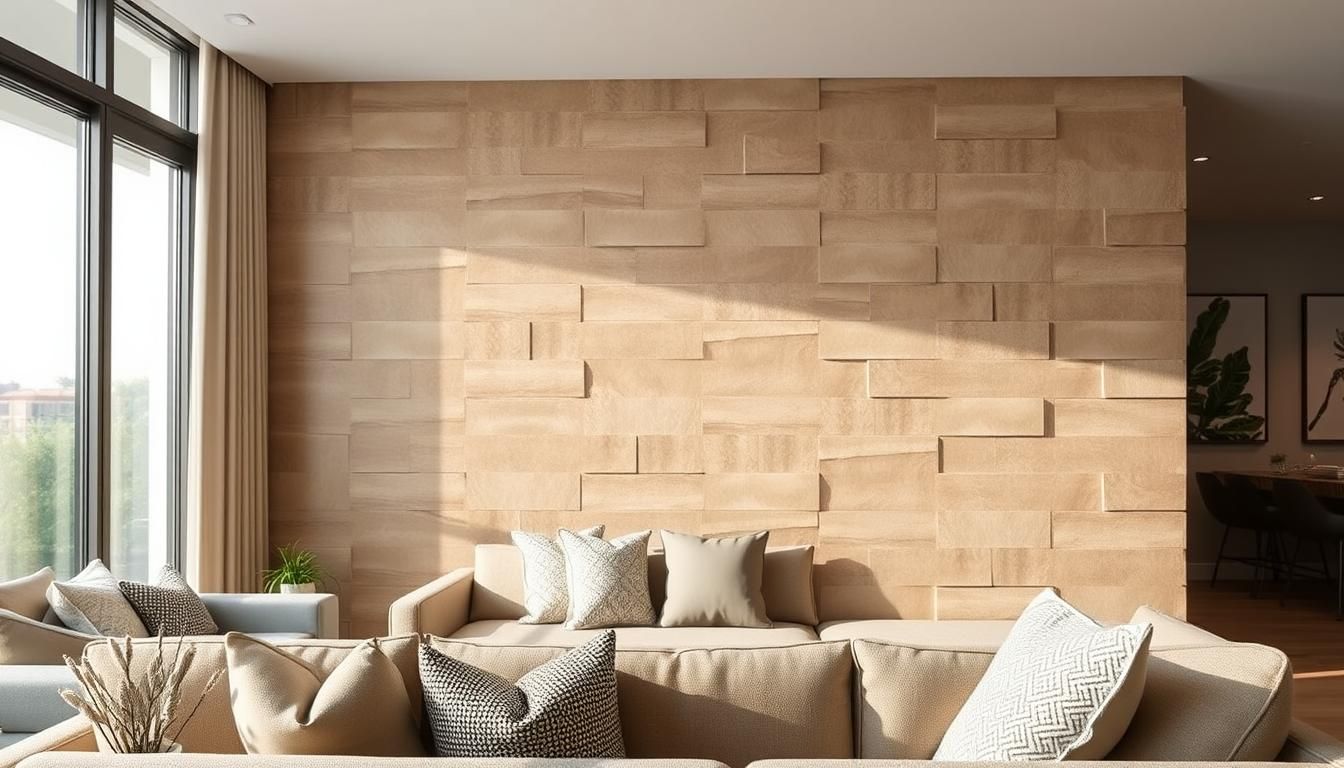
Natural Materials Domination: Wood accent walls, stone textures, and organic patterns are leading current trends. These materials add warmth while connecting interior spaces to nature.
Geometric Precision: Clean lines, perfect angles, and mathematical patterns appeal to modern sensibilities. Popular options include hexagonal tiles, diamond patterns, and linear wood slats.
Mixed Media Approaches: Combining materials (wood + metal, paint + wallpaper, texture + lighting) creates depth and visual complexity that photographs beautifully for social media.
Sustainable Options: Eco-friendly materials like reclaimed wood, low-VOC paints, and removable wallpapers align with environmental consciousness.
Complete Planning Guide: Preparation, Cost Analysis, and Design Principles
Successful DIY accent wall treatments start with thorough planning that considers room layout, material costs, and design principles. Proper preparation prevents costly mistakes and ensures professional-looking results that enhance your space’s value.
Wall Assessment and Preparation Checklist
Before starting any accent wall project, evaluate these critical factors:
-
Wall Condition Assessment
- Check for cracks, holes, or texture irregularities
- Test paint adhesion with a small scratch test
- Identify any moisture issues or previous damage
- Ensure the wall is structurally sound for heavier treatments
-
Electrical and Plumbing Considerations
- Locate all outlets, switches, and fixtures
- Mark cable/pipe locations behind the wall
- Plan around HVAC vents and returns
- Consider adding electrical for accent lighting
-
Room Measurements and Mapping
- Measure wall height, width, and any irregularities
- Note ceiling angles and floor level variations
- Calculate square footage for material ordering
- Create a scaled sketch on graph paper
Comprehensive Cost Breakdown by Treatment Type
Understanding project costs helps you choose the right accent wall treatment for your budget:
| Treatment Type | Material Cost | Tool Rental | Labor Time | Total Project Cost |
|---|---|---|---|---|
| Paint Accent Wall | $25-$75 | $0-$40 (sprayer) | 4-8 hours | $50-$150 |
| Peel-and-Stick Wallpaper | $50-$200 | $0 | 3-6 hours | $75-$250 |
| Wood Slat/Batten Wall | $100-$400 | $50-$100 | 8-16 hours | $200-$600 |
| Geometric Pattern Paint | $40-$100 | $20-$50 | 6-12 hours | $100-$200 |
| Faux Stone/Brick Panels | $150-$500 | $30-$60 | 6-12 hours | $250-$650 |
| Built-in Shelving Wall | $200-$800 | $100-$200 | 12-24 hours | $400-$1,200 |
| Textured Compound Treatment | $75-$200 | $50-$100 | 8-16 hours | $175-$400 |
Note: Costs vary by wall size (typically 80-120 sq ft), material quality, and regional pricing.
Material Selection and Quality Guidelines
Choosing the right materials ensures durability and visual appeal:
Paint Options for Accent Walls:
- Premium Paint: Benjamin Moore Advance, Sherwin-Williams ProClassic ($45-60/gallon)
- Mid-Range Paint: Behr Premium Plus, Valspar Reserve ($30-40/gallon)
- Budget Paint: Basic interior latex ($20-25/gallon)
Wood Materials for Accent Walls:
- MDF Boards: Smooth finish, easy to paint ($1-2/linear foot)
- Pine/Poplar: Natural grain, stainable ($2-4/linear foot)
- Reclaimed Wood: Unique character, eco-friendly ($5-15/linear foot)
For additional material selection guidance, The Kitchn provides excellent insights on choosing the right wood for your accent wall project.
Wallpaper Quality Levels:
- Vinyl/Washable: High durability, easy cleaning ($2-8/sq ft)
- Paper/Fabric: Premium look, delicate handling ($3-15/sq ft)
- Peel-and-Stick: Renter-friendly, temporary ($1-5/sq ft)
Design Principles for Accent Wall Success
Follow these fundamental design principles for optimal results:
Color Theory Application:
- Complementary Colors: Opposite on color wheel (blue/orange, red/green)
- Analogous Schemes: Adjacent colors for harmony (blue/blue-green/green)
- Monochromatic Approach: Single color family in varying shades
- 60-30-10 Rule: 60% dominant color, 30% secondary, 10% accent
Scale and Proportion Guidelines:
- Wall patterns should relate to room size and ceiling height
- Large patterns work in spacious rooms (10+ foot ceilings)
- Small patterns suit intimate spaces (8-9 foot ceilings)
- Pattern density should balance with furniture mass
Lighting Considerations:
- North-facing walls benefit from warm colors
- South-facing walls can handle cool tones
- Textured surfaces require adequate lighting to show dimension
- Consider accent lighting to highlight three-dimensional treatments
Complete Tool Guide and Material Lists for Professional Results
Having the right tools and materials makes the difference between a DIY project that looks homemade and one that rivals professional work. This comprehensive guide covers everything from basic hand tools to specialized equipment.
Essential Tool Categories by Project Type
Basic Paint Projects (All Skill Levels)
- Quality angled brushes (1.5”, 2.5”)
- Microfiber rollers (3/8” nap for smooth walls, 1/2” for texture)
- Paint tray with liner system
- High-quality painter’s tape (FrogTape or 3M)
- Drop cloths (canvas preferred over plastic)
- Ladder or step stool rated for your weight
Wallpaper Installation
- Wallpaper smoothing tool or squeegee
- Sharp utility knife with breakaway blades
- Metal straightedge (48” minimum)
- Seam roller for edges
- Spray bottle for adjustments
- Clean rags or paper towels
Wood and Panel Projects
- Circular saw or miter saw (rental recommended)
- Drill/driver with bits
- Level (4-foot minimum, 6-foot preferred)
- Stud finder (edge-finding type)
- Brad nailer with 1.25”-2” nails
- Sandpaper (120, 150, 220 grit)
Texture and Compound Applications
- Trowels (6”, 8”, and 12”)
- Texture rollers with various patterns
- Mixing paddle for drill
- Large mixing bucket
- Plastic sheeting for protection
Material Quality Comparison and Recommendations
Wood Materials Deep Dive:
| Material Type | Cost per Linear Foot | Pros | Cons | Best Use |
|---|---|---|---|---|
| MDF (Medium Density Fiberboard) | $1-2 | Smooth, paint-ready, stable | Not moisture-resistant, heavy | Painted accent walls, geometric patterns |
| Pine Boards | $2-4 | Natural grain, lightweight, affordable | Knots, grain irregularities | Rustic/farmhouse styles, stained finishes |
| Poplar | $3-5 | Fine grain, stain-ready, strong | More expensive, limited availability | Premium painted or stained walls |
| Reclaimed Wood | $5-15 | Unique character, eco-friendly, aged look | Inconsistent sizing, prep work required | Statement walls, mixed-width designs |
| Engineered Panels | $2-6 | Consistent, stable, various finishes | Can look manufactured | Modern/contemporary designs |
Paint Selection for Different Finishes:
- Flat/Matte: Hides imperfections, sophisticated look, harder to clean
- Eggshell: Slight sheen, durable, good for moderate traffic areas
- Satin: Washable surface, works well with textures, reflects some light
- Semi-Gloss: Very durable, easy cleaning, highlights imperfections
Apartment Therapy offers comprehensive paint finish recommendations for different room types and applications.
Tool Rental vs. Purchase Decision Guide
When to Rent (Recommended):
- Table saw for large wood projects ($40-60/day)
- Paint sprayer for multiple rooms ($30-50/day)
- Pneumatic nailer with compressor ($25-40/day)
- Large sanders for preparation work ($20-35/day)
When to Purchase (Long-term Value):
- Basic hand tools (measuring, levels, squares)
- Drill/driver set (used in many home projects)
- Quality brushes and rollers (reusable for years)
- Safety equipment (protect yourself on all projects)
Professional-Grade Consumables List
Adhesives and Fasteners:
- Construction adhesive (Liquid Nails or equivalent)
- Wood glue for joints
- Finish nails (1”, 1.25”, 1.5”, 2”)
- Screws (1.25”, 2”, 2.5” wood screws)
- Wall anchors for hollow areas
Prep and Finish Materials:
- Paintable acrylic caulk
- Wood filler (Bondo or similar for large gaps)
- Primer specific to your surface type
- Sandpaper assortment
- Tack cloth for dust removal
Safety and Protection:
- Safety glasses (ANSI rated)
- Dust masks/respirators (N95 minimum)
- Work gloves (cut-resistant preferred)
- Knee pads for floor-level work
- First aid kit
Specialty Tools for Advanced Techniques
Geometric Pattern Creation:
- Laser level for perfect lines ($50-100 rental)
- Chalk line reel
- Large compass for arcs
- Template materials (cardboard, hardboard)
Texture Application:
- Hopper gun for spray textures
- Various texture rollers and stamps
- Combing tools for linear patterns
- Sponges for organic textures
Measurement and Layout:
- Framing square (24”)
- Speed square (7”)
- Flexible curve ruler
- Grid paper for planning
- Digital angle finder
Paint Accent Wall Tutorials: From Simple Colors to Advanced Techniques
Paint remains the most accessible and transformative accent wall treatment, offering unlimited color options and techniques that suit any skill level. Modern paint accent wall techniques go far beyond single solid colors to include gradients, geometric patterns, and artistic effects.
Tutorial 1: Classic Solid Color Accent Wall
Materials Needed:
- Premium paint (1 quart covers 80-100 sq ft)
- High-quality primer
- Angled brushes (1.5”, 2.5”)
- Microfiber roller with extension pole
- Painter’s tape (FrogTape DelicateSurface)
- Drop cloths
- Paint tray with liners
Step-by-Step Process:
-
Surface Preparation (60-90 minutes)
- Remove outlet covers and light fixtures
- Clean wall with TSP substitute or mild detergent
- Fill nail holes with spackling compound
- Sand smooth when dry (120-grit paper)
- Vacuum dust and wipe with tack cloth
-
Color Testing and Selection
- Paint 12”x12” swatches in 3 different areas
- Observe colors at different times of day
- Check undertones against existing furnishings
- Consider how natural and artificial light affects the color
-
Priming (Essential Step)
- Apply high-quality primer with roller
- Use angled brush for edges and corners
- Allow full cure time (usually 4-6 hours)
- Light sanding between coats if needed
-
Paint Application Technique
- Start with brush work around edges
- Roll in “W” pattern, then fill in
- Maintain wet edge to avoid lap marks
- Apply thin, even coats rather than one thick coat
Advanced Color Techniques:
Ombre/Gradient Effect:
- Mix 4-5 paint shades from light to dark
- Blend while wet using long vertical strokes
- Work quickly with helper for large walls
- Mist lightly to extend working time
Two-Tone Geometric Designs:
- Map pattern with chalk lines and level
- Apply base color first, let dry completely
- Tape pattern precisely, seal edges
- Apply contrast color, remove tape while wet
Tutorial 2: Textured Paint Finishes
Sponge Painting Technique:
- Base coat in lighter shade
- Dab natural sea sponge in darker glaze
- Create irregular pattern with light pressure
- Vary hand position to avoid repetitive marks
Stripe Variations for Different Room Types:
| Room Type | Stripe Width | Color Contrast | Recommended Pattern |
|---|---|---|---|
| Small Bedroom | 2-4 inches | Low contrast | Vertical stripes to add height |
| Living Room | 6-12 inches | Medium contrast | Horizontal stripes to widen space |
| Kids’ Room | 4-8 inches | High contrast | Mixed widths for playful effect |
| Home Office | 1-3 inches | Subtle contrast | Pinstripes for professional look |
Color Psychology for Accent Walls
Understanding how colors affect mood and perception:
Energizing Colors (Best for Social Spaces):
- Red: Stimulates conversation, increases energy
- Orange: Promotes creativity, warm and inviting
- Yellow: Enhances happiness, makes spaces feel larger
Calming Colors (Ideal for Bedrooms):
- Blue: Promotes relaxation, lowers stress
- Green: Balances emotions, connects with nature
- Purple: Encourages introspection, adds luxury
Sophisticated Neutrals (Work Anywhere):
- Charcoal: Modern elegance, makes colors pop
- Warm Gray: Versatile backdrop, timeless appeal
- Deep Navy: Classic sophistication, works with any style
Common Paint Problems and Solutions
Problem: Paint Color Looks Different Than Expected
- Cause: Lighting differences, undertone conflicts
- Solution: Test large swatches, view at different times
- Prevention: Use primer, check with existing elements
Problem: Visible Brush or Roller Marks
- Cause: Wrong nap size, cheap tools, rushing
- Solution: Light sanding and additional coat
- Prevention: Quality tools, proper technique, adequate lighting
Problem: Paint Peeling or Poor Adhesion
- Cause: Inadequate surface prep, skipping primer
- Solution: Remove loose paint, prime, repaint
- Prevention: Thorough cleaning, appropriate primer for surface
Advanced Accent Wall Paint Techniques
Metallic Accent Finishes:
- Use metallic paint over dark base coat
- Apply with soft brush in long, smooth strokes
- Layer multiple metallic tones for depth
- Seal with appropriate topcoat for durability
Stenciled Accent Patterns:
- Choose stencils appropriate for wall size
- Secure stencil with low-tack spray adhesive
- Use minimal paint to prevent bleeding
- Clean stencil frequently for crisp lines
Chalkboard and Magnetic Paint Applications:
- Apply magnetic primer first (3 coats minimum)
- Follow with chalkboard paint (2-3 coats)
- Cure for recommended time before first use
- Season surface with chalk rubbed in and erased
Complete Wallpaper Accent Wall Guide: Traditional and Peel-and-Stick Applications
Wallpaper accent walls have experienced a dramatic renaissance, offering everything from subtle textures to bold statement patterns. Modern wallpaper options include traditional paste applications, peel-and-stick varieties, and innovative materials like grasscloth and metallic finishes.
Tutorial 1: Peel-and-Stick Wallpaper Installation
Materials and Tools Needed:
- Wallpaper (order 15% extra for waste and future repairs)
- Sharp utility knife with fresh blades
- Metal straightedge (48” preferred)
- Wallpaper smoother or squeegee
- Seam roller for edges
- Level (4-foot minimum)
- Measuring tape
- Pencil for light marking
Step-by-Step Installation Process:
-
Wall Preparation (30-45 minutes)
- Clean wall thoroughly with mild detergent
- Fill holes and sand smooth
- Ensure wall is completely dry
- Remove outlet covers and fixtures
- Check that wall surface is suitable (smooth, not heavily textured)
-
Planning and Layout
- Measure wall height and width precisely
- Calculate number of strips needed
- Plan pattern placement for best visual balance
- Mark a plumb vertical line using level
- Number each strip in order of installation
-
First Strip Installation (Critical for Success)
- Start from the most visible corner or center
- Peel back top 12” of backing paper
- Align carefully with plumb line
- Smooth from center outward to eliminate air bubbles
- Gradually peel and apply remaining sections
-
Subsequent Strips and Pattern Matching
- Match patterns precisely at seams
- Overlap slightly, then trim for perfect butt joint
- Use seam roller with light pressure
- Continue pattern matching across wall
Popular Wallpaper Accent Wall Styles for 2025:
| Pattern Type | Best Room Application | Style Compatibility | Typical Cost |
|---|---|---|---|
| Botanical/Floral | Bedrooms, dining rooms | Traditional, transitional | $3-8/sq ft |
| Geometric/Modern | Living rooms, offices | Contemporary, mid-century | $2-6/sq ft |
| Textured/Grasscloth | Any room, especially bathrooms | All styles | $4-12/sq ft |
| Metallic/Shimmer | Powder rooms, feature walls | Glam, modern | $5-15/sq ft |
| Vintage/Retro | Kids’ rooms, creative spaces | Eclectic, vintage | $2-7/sq ft |
| Wood Look/Planks | Any room | Farmhouse, rustic, modern | $1-4/sq ft |
Tutorial 2: Traditional Wallpaper with Paste
When to Choose Traditional Over Peel-and-Stick:
- Higher-end materials (silk, fabric-backed)
- Complex pattern matching requirements
- Permanent installation desired
- Maximum durability needed
Professional Installation Techniques:
Paste Mixing and Application:
- Use manufacturer-recommended adhesive
- Mix only what can be used in 2 hours
- Apply paste evenly with brush or roller
- Book wallpaper (fold paste-to-paste) for activation
Advanced Pattern Matching:
- Start with largest unbroken wall section
- Center dominant patterns on focal points
- Plan cuts to minimize waste
- Keep pattern alignment tools handy
Creative Wallpaper Applications Beyond Full Walls
Accent Wall Variations:
- Half-Wall Treatment: Wallpaper bottom half, paint top
- Ceiling Application: Create dramatic overhead interest
- Alcove Highlighting: Define built-in areas
- Stair Riser Treatment: Add pattern to stair faces
- Closet Interior: Surprise element when doors open
Mixed Media Approaches:
- Combine wallpaper with board and batten
- Frame wallpaper sections with molding
- Use wallpaper as headboard backing
- Create art panels with wallpaper in frames
Maintenance and Durability Considerations
Longevity by Wallpaper Type:
- Vinyl: 10-15 years, highly washable
- Paper-backed: 5-7 years, moderate durability
- Fabric: 7-12 years, professional cleaning recommended
- Grasscloth: 8-10 years, vacuum only maintenance
Cleaning and Care Guidelines:
- Test cleaning methods on inconspicuous areas
- Use appropriate cleaners for material type
- Address stains immediately to prevent setting
- Avoid excessive moisture on paper-backed varieties
Removal Considerations:
- Peel-and-stick: Generally removes cleanly
- Traditional: May require steaming and scraping
- Factor removal difficulty into decision
- Consider wall surface condition before installation
Troubleshooting Common Wallpaper Issues
Problem: Air Bubbles After Installation
- Solution: Prick with fine needle, smooth air out
- Prevention: Work slowly, smooth continuously
Problem: Seams Lifting or Visible
- Solution: Apply seam adhesive, roll firmly
- Prevention: Proper overlap and trimming technique
Problem: Pattern Mismatch at Seams
- Solution: May require strip replacement
- Prevention: Careful measuring and cutting
Problem: Wallpaper Won’t Stick to Wall
- Solution: Check wall cleanliness and primer compatibility
- Prevention: Proper surface preparation
Room-Specific Wallpaper Recommendations
Bedroom Accent Walls:
- Soft, soothing patterns behind headboard
- Avoid busy patterns that may disturb sleep
- Consider removable options for easy style changes
Living Room Feature Walls:
- Bold patterns work well in large spaces
- Consider sight lines from multiple seating areas
- Coordinate with existing color scheme
Bathroom Applications:
- Choose moisture-resistant vinyl wallpapers
- Ensure proper ventilation to prevent peeling
- Consider powder rooms for dramatic patterns
Home Office Accent Walls:
- Avoid distracting patterns behind computer screens
- Choose colors that enhance productivity
- Consider texture over busy prints
Geometric Accent Walls: Paint and Wood Slat Tutorials
Geometric patterns represent the cutting edge of modern accent wall design, combining mathematical precision with artistic flair. These treatments range from simple painted shapes to complex three-dimensional wood installations that create stunning focal points.
Tutorial 1: Painted Geometric Patterns
Popular Geometric Patterns for 2025:
- Hexagon Honeycomb: Creates organic flow within structured design
- Diamond Grid: Classic elegance with modern appeal
- Chevron/Zigzag: Dynamic energy, makes spaces feel larger
- Triangle Clusters: Contemporary art installation effect
- Linear Stripe Variations: From simple to complex layered designs
Materials for Painted Geometric Walls:
- High-quality painter’s tape (FrogTape)
- Chalk line reel
- Long level (6-foot recommended)
- Paint in 2-4 coordinating colors
- Small artist brushes for detail work
- Grid paper for planning
- Laser level (rental recommended for complex patterns)
Step-by-Step Hexagon Pattern Tutorial:
-
Pattern Planning and Layout (2-3 hours)
- Create scaled drawing on graph paper
- Determine hexagon size (6-12 inches typical)
- Mark center point on wall
- Use level to establish horizontal reference lines
- Calculate spacing to avoid awkward edge cuts
-
Creating the Grid System
- Mark primary grid points with pencil
- Use compass or template for consistent shapes
- Snap chalk lines for hexagon outlines
- Double-check angles with protractor (120° internal angles)
- Number each hexagon for color coding
-
Taping and Paint Application
- Apply base color to entire wall, let dry
- Tape hexagon boundaries precisely
- Seal tape edges with base color
- Apply accent colors in planned sequence
- Remove tape while paint is slightly tacky
Color Strategy for Geometric Patterns:
| Pattern Type | Color Approach | Visual Effect | Best Room Type |
|---|---|---|---|
| Hexagon | 3 tones of same color | Subtle sophistication | Bedrooms, offices |
| Diamond | High contrast alternating | Bold statement | Living rooms |
| Chevron | Gradient progression | Dynamic movement | Hallways, kitchens |
| Triangle | Analogous color scheme | Modern art effect | Creative spaces |
Tutorial 2: Wood Slat Geometric Walls
Wood slat accent walls combine natural materials with geometric precision, creating sophisticated three-dimensional features that add warmth and texture.
Material Selection for Wood Slat Walls:
- 1x2 Pine Strips: Affordable, easy to work with
- 1x3 Poplar: Smoother finish, takes stain well
- MDF Strips: Consistent dimensions, paint-ready
- Hardwood Options: Oak, maple for premium installations
Horizontal Slat Wall Tutorial:
Materials Needed:
- Wood strips (calculate linear footage + 10% waste)
- Construction adhesive
- Brad nailer with 1.5” nails
- Spacers for consistent gaps
- Level
- Miter saw or circular saw
- Sandpaper (120, 150 grit)
Installation Process:
-
Wall Preparation and Planning
- Locate and mark all studs
- Plan slat layout to avoid awkward spaces
- Calculate spacing (typically 2-6 inches between slats)
- Create spacer blocks for consistent gaps
-
Slat Cutting and Preparation
- Cut all slats to exact wall width
- Sand ends and faces smooth
- Pre-drill if splitting occurs
- Organize by installation order
-
Installation Sequence
- Start with bottom slat, check level
- Apply construction adhesive to back
- Nail into studs every 16-24 inches
- Use spacer blocks for consistent gaps
- Continue upward, checking level frequently
Vertical Slat Variations:
- Full Height: Floor to ceiling for maximum impact
- Wainscot Height: 36-42 inches for classic proportions
- Custom Heights: Match furniture or architectural features
- Mixed Widths: Combine different slat widths for visual interest
Advanced Geometric Techniques
3D Geometric Wall Sculptures:
- Use varying thicknesses for depth
- Create shadow boxes within geometric frames
- Incorporate lighting behind translucent panels
- Layer geometric shapes for complex patterns
Mixed Material Geometric Designs:
- Combine wood slats with painted sections
- Integrate metal accents for industrial appeal
- Add fabric panels within geometric frames
- Use mirrors as geometric accent elements
Mathematical Planning for Perfect Geometry
Essential Calculations:
- Hexagon Layout: Use 60-degree angles, equal side lengths
- Diamond Patterns: 45-degree rotation of squares
- Chevron Angles: Typically 45-60 degrees for visual appeal
- Spacing Ratios: Follow golden ratio (1:1.618) for pleasing proportions
Tools for Precision:
- Digital angle finder for exact measurements
- Laser level for long straight lines
- Large compass for arc construction
- Grid templates for consistent spacing
Finishing Techniques for Geometric Walls
Paint Finish Options:
- Matte Finish: Hides imperfections, sophisticated look
- Satin Finish: Subtle sheen, easy cleaning
- Contrast Sheens: Combine matte and semi-gloss for definition
Wood Finish Options:
- Natural Stain: Highlights wood grain and character
- Painted Finish: Allows bold color statements
- Two-Tone: Alternate slat colors for pattern emphasis
- Weathered Finish: Add texture with distressing techniques
Troubleshooting Geometric Pattern Issues
Problem: Pattern Looks Crooked or Uneven
- Cause: Inadequate initial layout, room irregularities
- Solution: Use laser level, adjust for room imperfections
- Prevention: Careful initial measurement and layout
Problem: Paint Bleeds Under Tape
- Cause: Poor tape adhesion, wrong tape type
- Solution: Score tape line, use sealer base coat
- Prevention: Quality tape, proper surface preparation
Problem: Wood Slats Appear Wavy
- Cause: Inconsistent spacing, wall irregularities
- Solution: Adjust with shims, consistent spacer blocks
- Prevention: Check wall flatness before installation
Board and batten and wood accent wall upgrades
Board-and-batten trim brings instant depth with simple vertical strips and a neat cap rail. This budget-friendly approach adds real character and feels special without heavy carpentry.
What it is: Classic board batten uses vertical battens over a smooth surface or thin panels, capped with a top rail for a tailored look.
Layout basics: Decide spacing to balance the wall and furniture—12–18 inches is common. Match spacing near doors and windows so the design reads as one integrated design across the room.
Simple batten spacing and trim profiles that add character
- Material: MDF for smooth, paint-ready battens; pine if you prefer visible grain for a wood accent wall.
- Profiles: square edge for modern looks; ogee or cove for traditional style. A small ledge can double as a picture rail.
- Order: install base cap and top rail first, add center battens, then fill in symmetrically for even reveals.
- Prep & finish: skim coat textured walls or mount thin panels first, caulk seams, fill nail holes, sand flush, then prime and paint.
- Height tips: one-third wall height for a balanced wainscot; two-thirds for dramatic coverage behind a bed or sofa.
| Room | Spacing | Finish |
|---|---|---|
| Entry | 12–14” | High-contrast paint |
| Bedroom | 14–18” | Monochrome, soft sheen |
| Living room | 12–16” | Stained pine or painted MDF |
Color strategy: Contrast battens with a lighter upper field for crisp lines, or go monochrome to play with shadow and texture. Small choices like these make the design feel purposeful and custom-built.
Faux panels that mimic brick, stone, and beadboard
Lightweight faux brick and faux stone panels add instant depth and a cozy, rustic style without heavy masonry work. They cut easily, fasten with simple tools, and give rooms a cottage or lodge vibe in a weekend.
Choosing the right material: compare thin sheets that scribe to uneven floors with real brick or stone. Dry-fit panels to check seams and pattern repeat so the color variation and mortar lines look natural.
!faux panels
- Locate studs, use construction adhesive plus nails, and scribe edges for tight corners.
- Tone down factory sheen with paint or glaze; add subtle washes for depth.
- Beadboard panels make cozy mudrooms and halls; cap with a chair rail for a finished look.
- Trim outlets and baseboards carefully; hide joints with color-matched caulk.
Style tips: paint panels one tone for a sculptural look or leave them natural for authenticity. Pair faux stone with warm metals and woven fibers to complete the cottage aesthetic.
Durable, wipeable finishes make these wall ideas practical for high-traffic zones and easy to clean. Most full-wall installs are achievable in a day, so the new look arrives fast.
Mirror magic: a reflective focal point that enlarges space
A large decorative mirror can act like a window, folding light and depth into a tighter space. A substantial mirror instantly becomes a strong focal point and gives a small room a more open feel.
Place the mirror opposite a window or lamp to bounce natural light across the room. This simple swap brightens dim corners and visually doubles depth.
Scale matters: choose a mirror that fills two-thirds to three-quarters of the wall above a console, sofa, or mantel. Proper proportion keeps the piece from overpowering furniture and preserves balance in the look.
Mounting tips: use anchors rated for the mirror’s weight or opt for French cleats. Hit studs when possible and verify weight ratings for hardware to protect the point of installation and your household.
- Group identical mirrors in a grid for a modern feature, or pick an arched statement mirror for classic elegance.
- Pair mirrors with minimalist furniture so the composition stays clean and uncluttered.
- Avoid positioning that reflects cluttered areas or TVs unless that’s the intended view.
Renters can lean a tall floor mirror against the surface and secure it with anti-tip hardware for the same effect without new holes.
“A well-placed mirror creates instant depth and becomes the natural focal point of a living space.”
Care: wipe with a lint-free cloth and glass cleaner, and protect nearby paint or trim from overspray.
Used thoughtfully, a mirror complements color or panel choices and seals the room’s design with a single, reflective point that enlarges both light and mood.
DIY accent wall treatments that add texture without lumber
Add handcrafted texture to a single surface using compound and simple tools for a high-impact, lumber-free update.
Using wall texture compounds for depth and shadow
Texture compound applied with a roller, trowel, or knife can sculpt waves, stucco, or plaster effects without lumber. Test on a scrap panel to find the tool that makes the ridges and shadow you want.
Work in small sections so the compound stays pliable. Mist the surface lightly to extend open time and avoid drag lines. Follow manufacturer thickness limits to prevent cracking as the material cures.
Feather edges for seamless transitions and sand lightly for refinements before priming. Prime textured areas with a high-build primer to even absorption, then choose paint that enhances the look.
- Refine pressure and motion on test panels; different trowels give varied shadows.
- Frame the textured field with simple 1x2 trim for a gallery-like finish.
- Protect floors and nearby surfaces with plastic sheeting and tape for easy cleanup.
- For renters, apply compound to removable panels or plywood backers mounted to studs.
“A thin, well-primed texture can create depth that paint alone cannot match.”
Diamond panel pattern wall: modern geometric dimension
A diamond-panel scheme adds crisp geometry and a modern edge to a single surface. This approach uses repeated shapes to create depth and a gallery-like finish. It fits living rooms and bedrooms where a focused design makes an impact.
Gridding with chalk lines at 45 degrees
Marking and aligning the grid
Start by placing painter’s tape at the top and bottom, marking equal increments (for example, every 6 inches). Snap 45-degree chalk lines across the field and verify angles with a square.
Use temporary nails as anchors when working alone to keep lines true.
Cutting and setting pieces
Batch-cut MDF: 20”x20” large squares, 4”x4” small squares, and 20”x4” strips on a table saw. Dry-fit a few diamonds to confirm spacing before adhesive or fasteners.
- Install large squares first with a thin bead of construction adhesive and brad nails.
- Add strips, then finish with small squares for definition.
- Cut partials to maintain consistent reveals at top and bottom.
Finish and paint for a flawless result
Fill nail holes and seams with paintable, sandable caulk. Prime MDF edges to prevent fuzz and then spray for even coverage. Choose monochrome to show shadow or a bold hue to make the geometry the star of the room.
“Precise layout and careful finishing turn a geometric scheme into a refined, architectural look.”
Off-kilter stud wall: angled boards for architectural interest
A single angled run of boards can turn an ordinary surface into a striking architectural feature. Use 1”x2” pine cut on a compound miter saw, and trim the bottom ends at 45 degrees so each piece nests cleanly against the floor and ceiling.
Setting anchor boards and consistent spacing
Start by mapping the angle on graph paper to confirm scale for your living area. Install two long anchor boards first to define the diagonal field. Use a pre-cut spacer—12 inches is a good starting point—to keep each run parallel and even.
- Add short perpendicular blocks between anchors to mimic blocking and add depth.
- Fasten with a brad nailer and a bit of spot adhesive; press each board flat to avoid gaps.
- Cope or fine-sand miters where boards meet the ceiling and base for a tight fit.
Two-tone paint options to highlight the pattern
Caulk seams and fill nail holes before finishing. For contrast, paint the field one color and the boards another to emphasize the geometry without overwhelming the room.
Practical paint tip: if you hand-roll, choose spacing that lets a 9-inch roller pass comfortably between runs. Pine is affordable and easy to work; pre-primed trim speeds finishing and reduces soak-through.
!off-kilter stud wall
| Step | Tool/Material | Why it matters |
|---|---|---|
| Layout & mapping | Graph paper, chalk line | Ensures scale and angle match furniture and ceiling height |
| Anchor install | 1”x2” pine, compound miter saw | Defines the diagonal composition and reference runs |
| Finish | Caulk, filler, paint or sprayer | Creates clean joints and a paint-ready surface |
“Angled boards add motion and a custom look without rebuilding the plane.”
Faux brick with wood blocks for a classic, budget look
Wood blocks sized like bricks let you craft a budget-friendly brick look with real depth and shadow. This method uses simple furring strips and careful spacing to mimic a running-bond pattern that reads like masonry from across the room.
Running-bond layout, repetitive cuts, and spacing templates
Materials: 1”x3” furring strips cut to brick size. Measure a real brick to set your block length, then batch-cut on a miter saw using a stop for consistent pieces.
Snap a centerline and level course lines. Use a 90-degree template that keeps a 1/2-inch gap for simulated mortar. Start center and work outward, staggering joints each course for an authentic running-bond pattern.
Texturing “mortar” and spraying paint for realism
Nail each block with two brads and a spot of adhesive; use partials at ends and the top. Carve small chips or softened corners on select pieces with a rotary tool for aged detail.
- Fill nail holes with paintable nonsilicone caulk and sand smooth.
- Mist on spray wall texture to mimic gritty mortar joints, then let dry.
- Spray a masonry-inspired color for base coverage; dry-brush highlights to lift the pattern.
- Seal with a matte clear coat and frame the installation with simple trim to hide edge partials.
Design tip: Pair this faux brick surface with industrial lighting or vintage art to reinforce the classic brickhouse designs and create a cozy, lived-in look on a single focal surface.
Built-in bookshelves accent wall for storage and style
Framing a recessed shelving bay creates sturdy support and a custom look that reads as built-in furniture. Start by installing side frame pieces in corners and on adjacent walls, fastening them to studs so the unit is anchored to the home structure.
Framing, joinery, and adjustable shelves
Attach top and bottom frames and vertical columns with pocket holes and screws for concealed, strong joins. Drill 1/4-inch holes for shelf pins using a shelf-pin jig and follow the pin load ratings before loading books or media.
Finishing faces and adding plug-in lighting
Face frames with 1x2 strips to hide seams and achieve a furniture-grade look. Add a 6-inch header to mount plug-in puck or linear accent lights; bore discreet holes to route cords to a properly rated extension cord.
- Confirm the perimeter frame is plumb and square to prevent sagging.
- Dry-fit and label shelves before final assembly.
- Caulk, fill, sand, prime, and paint; use cabinet enamel on shelves for durability.
“Combine books, art, baskets, and plants to balance storage and style on your feature wall.”
Wood slice mosaic wall: organic texture with bold color
A clustered mosaic of wood rounds brings organic rhythm and bold color to a single surface. This technique pairs natural elements with a painted palette for a gallery-like focal in your home.
Mounting stained plywood backers to studs
Mark studs with tape and fasten plywood panels directly to them using screws. Pre-stain the plywood (ebony is a striking choice) so gaps read as intentional shadow lines that enhance depth.
Cutting, arranging, and adhering varied-diameter slices
Remove bark and cut 1/2-inch-thick slices from branches or dowels in mixed diameters. Sand faces and edges lightly to remove splinters and improve paint or finish adhesion.
Confirm slice diameters fit your saw’s fence capacity and follow safe cutting practices: keep hands clear, use push blocks, and avoid over-slicing as pieces near the blade.
Dry-fit the layout, aiming for roughly a 4:1 ratio of large to small pieces. Use a fast-set construction adhesive and press slices onto the backer quickly. Paint selected rounds with a paint-and-primer mix for strong coverage, or leave many natural for contrast.
- Why a plywood backer matters: it gives secure adhesion and lets you remove the installation later with only a few screw holes to patch.
- Edge-frame the mosaic for a clean termination and visual containment.
- Seal with a matte or satin clear coat for a unified sheen and durable finish.
- The irregular surface softens echo, adding subtle acoustic benefits to living areas.
“Mixing natural rounds with a few painted pieces creates a lively, tactile design that reads like art.”
Terra cotta ripple wall: troweled texture and warm color
A terra cotta ripple finish pairs warm color with gentle texture for a cozy, sunlit look. This method mimics sun‑washed plaster and works as a focused feature behind a bed, sofa, or console.
Mixing and tools
Mix the compound exactly per manufacturer directions. Use a wide trowel for sweeping waves or a textured roller for a uniform stipple. Practice on scrap board first to dial in pressure and motion.
Application tips
Work in small sections and keep passes thin to avoid heavy ridges that can crack. Mist the surface lightly with water to extend open time and use a pulling motion with the trowel to reduce scuffing.
Clean edge framing and trim
Install a simple 1x2 frame while the compound is still pliable so trim presses flush. Use scarf joints for longer runs—make angled cuts that meet cleanly, glue, and clamp for tight seams.
- Stay within maximum thickness limits on the product label to prevent cracking.
- Allow full drying per directions before you paint; painting over damp texture harms adhesion.
- Finish with a breathable, matte terra cotta paint applied with a thick‑nap roller to keep the artisanal look.
Styling and alignment
Coordinate linen, jute, and terra cotta ceramics to tie the feature into the room palette. Use the frame to square the field to the ceiling and baseboards so the finished rectangle looks intentional even on imperfect surfaces.
“Soft ripples and an earthy hue create a handcrafted look that ages well and plays with light throughout the day.”
Picking the right accent wall ideas for living rooms and bedrooms
Pick the place your eye lands first and let that area guide color, texture, and scale. Accent surfaces deliver a quick, affordable makeover when they match your personal style and the room’s function.
Living room focal points: media units, fireplaces, and one-wall drama
For living rooms, aim for presence. Feature the area around a media unit or fireplace with paneled trim, geometric slats, or faux stone for instant impact.
Use a single strong surface behind a sofa to define seating in open plans. Avoid busy patterns directly behind TVs to cut glare and distraction.
- Large prints and wider battens suit spacious gathering rooms.
- Choose darker finishes only if the room gets plenty of natural light.
Bedroom serenity: headboard walls, soft palettes, and pattern scale
In a bedroom, favor calm. Keep colors soft and textures gentle—board-and-batten or narrow geometric repeats work well at headboard height.
Use finer motifs and narrower spacing in cozier rooms so the design soothes rather than shouts. Measure furniture footprints so the feature aligns with the bed and bedside tables for a composed look.
“Tie textiles and art to your feature palette for cohesion without matching too closely.”
Paint color strategy: coordinating walls, ceilings, and trim
Deciding how ceilings and trim relate to a feature color makes the whole design feel intentional. Start by comparing swatches against a pure white and a warm and cool reference to reveal hidden undertones like pink, green, or violet.
Contrast and coordination: Pair a deep feature with light walls and crisp white trim for drama, or choose low contrast for a calm, textural room. For ceilings, a slightly lighter or desaturated version of the same hue softens transitions and can make a room feel taller.
Sheen and texture: Matte hides flaws on textured or paneled surfaces. Satin or semi-gloss highlights profiles and cleans easily. Use a sprayer for complex profiles—diamonds, slats, and panels—so paint reaches edges and provides a smoother finish.
Always prime bare MDF and patched areas to avoid flashing and uneven absorption. Caulk seams and trim before you paint; a clean bead at joints makes the result look pro-level.
Test large sample boards on the actual surface and view them morning and evening. Record final paint codes and finish sheen for easy touch-ups and future coordinating projects.
| Decision | Recommendation | Why it matters |
|---|---|---|
| Undertone check | Compare swatch to pure white + warm/cool refs | Reveals hidden casts that alter perceived color |
| Ceiling hue | Slightly lighter or desaturated match | Softens transition; adds perceived height |
| Sheen choice | Matte for flaws; satin/semi-gloss for detail | Controls how texture and light read on surfaces |
| Prep | Prime MDF, caulk seams | Prevents flashing and creates smooth finish |
Budget, safety, and timeline tips for weekend DIYers
A clear budget and a safe plan make weekend projects finish faster and stress-free.
Cost-saving materials and when to rent tools
Plan costs line-by-line. List tools, fasteners, adhesive, caulk, primer, paint or wallpaper, and trim. Add a 10% contingency for mistakes or extra cuts.
Rent big items like a paint sprayer or table saw for one-off jobs. Renting saves cash and improves finish quality without long-term storage.
Swap materials to save: use MDF instead of hardwood, faux stone or wallpaper instead of real masonry. Construction adhesive plus brads speeds installs and cuts labor.
Ventilation, PPE, and adhesive/texture handling
Protect yourself and your home. Always work with good ventilation when cutting MDF, spraying finishes, or using strong adhesives. Wear eye, hearing, and respiratory protection.
Test adhesives and texture compounds on scrap to check open time and final look. Follow manufacturer thickness limits to avoid cracking.
Set a safe workflow: cut/sand outdoors when possible, mask off rooms, cover floors, and stage materials before you start. Keep cleanup gear—shop vac, rags, and trash bags—handy for fast resets.
| Project Type | Typical Timeline | Notes |
|---|---|---|
| Paint or peel-and-stick | One day | Fast prep, same-day finish possible |
| Panels or slats | Full weekend | Allow time for caulk and paint |
| Faux stone or built-in shelves | 2–3 days | Includes curing and hardware mounting |
“Batch cuts, pre-prime trim, and staged workdays keep momentum and save time.”
Transform Your Space Today: Your Next Steps to Stunning Accent Walls
The power to completely transform your living space lies within a single wall. With over 15 detailed tutorials, comprehensive cost breakdowns, and professional techniques covered in this guide, you now have everything needed to create stunning DIY accent wall treatments that rival professional installations.
Whether you choose a simple paint accent wall for immediate impact or tackle an ambitious wood accent wall project for dramatic transformation, remember that every expert started with their first project. The key is selecting a technique that matches your skill level, budget, and timeline.
Start with these immediate action steps:
- Choose Your Wall: Identify the focal point wall in your target room
- Set Your Budget: Use our cost breakdown tables to plan your investment
- Gather Inspiration: Save images that match your style preferences
- Test Your Approach: Start with color samples or small test sections
- Plan Your Timeline: Block out adequate time for proper preparation and execution
For living room accent walls, focus on creating drama behind sofas or entertainment centers. Bedroom accent walls work best with calming colors and textures behind headboards. Remember that proper preparation—from wall assessment to stud location—ensures professional results that add real value to your home.
The techniques in this guide have helped thousands of homeowners create magazine-worthy spaces without professional installation costs. Your walls are waiting for transformation, and with proper planning and execution, your next accent wall project will become the focal point that makes your entire home feel fresh and personalized.
Ready to begin? Choose one technique from this guide, gather your materials, and start creating the accent wall that will make your space uniquely yours. For more home design inspiration and step-by-step tutorials, explore our related articles on smart lighting solutions and plant integration ideas.
FAQ
What is the fastest way to create a focal point in a living room?
Choose a single wall behind the sofa or TV and add bold paint, a patterned peel-and-stick wallpaper, or a simple board-and-batten grid. All three options require minimal demolition, can be completed in a weekend, and immediately draw the eye to create a focal point.
How do I plan measurements and layout before starting a project?
Sketch the wall on graph paper, note stud locations with a stud finder, and transfer key dimensions to full-scale chalk lines on the wall. This helps you visualize spacing for slats, panels, shelves, or geometric shapes and avoids wasted cuts and uneven patterns.
Which tools are essential for most accent wall projects?
A brad nailer or finish nail gun, circular saw or miter saw, level, tape measure, stud finder, caulking gun, and safety gear are core. For textures or faux panels, add adhesive and a lightweight trowel. Rent heavy tools if you’ll only use them once.
What materials work best for wood slat or panel installations?
Common choices include primed MDF for painted panels, pine or poplar boards for stain finishes, and engineered wood for stability. Use construction adhesive plus nails into studs or a clean frame to keep panels secure and flat.
Can I get a woodgrain or plank look without using real timber?
Yes. Peel-and-stick wallpapers now mimic woodgrain convincingly. There are also vinyl plank panels and thin faux wood boards that install like tile or large panels, offering texture without the weight or cost of solid lumber.
How do I achieve crisp geometric patterns with paint?
Start with a perfectly flat, primed surface. Measure and mark lines with a pencil, use low-tack artist’s tape for edges, and apply two thin coats of paint. Remove tape while paint is still slightly damp to prevent peeling and get clean edges.
What spacing is recommended for board-and-batten designs?
Common spacing ranges from 4 to 8 inches between battens, depending on the scale of the room. Narrower spacing suits small rooms and traditional styles; wider spacing reads as modern and works well on larger walls.
Are faux brick or stone panels a good option for renters?
Lightweight peel-and-stick brick tiles or foam panels offer a tenant-friendly solution. They stick to clean drywall, can be removed without major damage, and provide realistic texture without the mess of mortar or heavy installation.
How can mirrors be used to enhance a small space?
A mirrored focal wall multiplies light and visually enlarges a room. Use framed mirrors in a grid or large mirror panels behind shelving to reflect artwork and furniture, making the space feel brighter and deeper.
What methods add texture without wood or heavy materials?
Wall texture compounds, Venetian plaster, or textured paint additives create depth and shadow. These methods are lighter, often require only basic tools, and can be finished with paint or a metallic glaze for extra interest.
How do I build a diamond or grid panel pattern with MDF?
Lay out 45-degree chalk lines, cut MDF squares and narrow strips to match, and adhere them with construction adhesive plus nails into studs where possible. Fill seams, caulk edges, prime, and spray or roll the finish for a seamless look.
What safety and ventilation tips should weekend builders follow?
Always wear eye protection, a dust mask or respirator when cutting or sanding, and gloves when handling adhesives. Ensure good ventilation when using paints, primers, or texture compounds and let solvents fully dry before closing the room.
How can I keep a project budget-friendly without sacrificing style?
Use primed MDF instead of hardwood, choose peel-and-stick options for complex textures, and repaint existing trim instead of replacing it. Prioritize high-impact areas like the main wall behind a media center or bed and save splurges for hardware or lighting.
What paint sheen is best for textured surfaces?
Eggshell or satin sheens work well on textured walls because they hide imperfections while offering slight reflectivity. Use semi-gloss only on trim and beadboard where washability matters most.
Can built-in shelving be combined with a decorative wall for storage and style?
Yes. Frame shelves to studs, use pocket holes for strength, and incorporate adjustable shelf pins for versatility. Finish faces to match the wall treatment and add plug-in accent lighting to highlight collections and create depth.
How do I create a natural wood-slice mosaic look without heavy carpentry?
Mount plywood backers to the wall, then glue varied-diameter wood slices to the backer with construction adhesive. Seal with a clear coat and paint or stain the background for a pop of color without a heavy structural build.
What two-tone paint options work best for angled board patterns?
Choose a neutral base and a richer contrasting color to emphasize the angle. For subtlety, pair coordinating undertones—warm beige with a deeper taupe; for drama, pair charcoal with a warm ochre. Keep sheen consistent to avoid distracting reflections.
How realistic can a faux brick wall look using wood blocks?
Very realistic if you cut blocks to a running-bond layout, add thin grout lines with textured compound, and use layered paint techniques—dry brushing, washes, and light sponging—to mimic mortar and natural wear.
Which projects should I leave to a professional?
Structural alterations, electrical work for built-in lighting, and complex cabinetry are best left to licensed pros. Cosmetic paneling, paint patterns, and peel-and-stick installations are ideal for confident weekenders.
What color strategies help coordinate walls, ceilings, and trim?
Use a unifying undertone across your palette. If the focal wall is bold, keep ceiling and trim lighter in the same family. For contrast, choose a trim color one to two shades deeper than the ceiling and a coordinating neutral for adjacent walls.