Transform any room in your home with custom DIY sliding barn doors that combine functionality with stunning visual appeal. Whether you’re looking to add rustic charm to your farmhouse kitchen or create a sleek modern focal point in your bedroom, these comprehensive barn door plans will guide you through every step of the construction process.
Building your own sliding barn door saves hundreds of dollars compared to purchasing pre-made doors while giving you complete control over design, materials, and finish. Home improvement experts at Lowe’s confirm that DIY barn doors typically cost 60-80% less than custom-built alternatives while offering unlimited customization options. This detailed tutorial covers everything from measuring your space and selecting the right hardware to advanced finishing techniques that create professional results.
With clear instructions, detailed material lists, and troubleshooting tips, you’ll have the confidence to tackle this rewarding DIY project. These plans work for standard doorways, closets, pantries, and even room dividers, making them perfect for maximizing space in any home. For related solutions, explore maximize your living space with dual-purpose furniture.
Key Takeaways
- Multiple design options: rustic Z-brace, modern frame-and-panel, or sleek contemporary styles
- Complete material specifications: detailed cut lists with exact measurements and hardware requirements
- Cost-effective solutions: save $200-800 compared to purchasing pre-made barn doors
- Room-specific applications: perfect for bedrooms, bathrooms, closets, pantries, and office spaces
- Professional finishing techniques: achieve furniture-quality results with proper preparation and application
- Safety considerations: proper mounting techniques and weight distribution for long-lasting installation
- Maintenance guidelines: keep your sliding barn door functioning smoothly for years to come
Why Choose DIY Sliding Barn Doors for Your Home
Sliding barn doors have become one of the most popular home design trends, combining practical space-saving benefits with striking visual appeal. According to Better Homes & Gardens, barn doors consistently rank among the top requested features for both renovations and new construction projects. Unlike traditional swing doors that require clearance space, barn doors slide along a mounted track, making them perfect for tight spaces, small rooms, and areas where every square foot matters.
Space efficiency is just the beginning. These versatile doors work beautifully in master bedrooms as closet doors, in kitchens to conceal pantries, in bathrooms for privacy without sacrificing floor space, and as room dividers in open-concept homes. The sliding mechanism eliminates the need for door swing clearance, effectively giving you back 6-9 square feet of usable space per door.
Cost Savings and Customization Benefits
Building your own sliding barn door offers significant financial advantages. Pre-made barn doors typically cost $300-1200 depending on size and materials, while a DIY version can be built for $75-300. Professional contractors featured in Home Depot report that DIY installations represent some of the highest-value home improvement projects for both cost savings and impact. This represents potential savings of 60-80% while giving you complete control over dimensions, wood selection, hardware style, and finish.
Customization possibilities are endless. You can match existing trim and cabinetry, incorporate reclaimed wood for authentic character, or create sleek modern designs with clean lines. The ability to build doors that perfectly fit your specific opening eliminates the compromise often required with standard sizes.
Project Overview and Skill Requirements
This comprehensive guide covers three distinct barn door styles: rustic Z-brace doors perfect for farmhouse aesthetics, frame-and-panel doors offering traditional elegance, and modern slab doors with contemporary appeal. Each style includes detailed cut lists, assembly instructions, and finishing techniques.
Skill level required: Intermediate DIY experience with basic woodworking tools. You should be comfortable using a circular saw, drill, and sanders. The project typically requires 2-3 weekends to complete, including drying time for finishes.
For related solutions that maximize small spaces, explore floating desk installation guide.
Complete Materials List and Measurements
Proper planning and accurate measurements are essential for a successful barn door installation. This section provides detailed specifications for three door sizes and complete material lists with current pricing estimates to help you budget your project effectively.
Standard Door Dimensions and Measurements
Measuring your opening: Start by measuring the width and height of your door opening. Add 4-6 inches to the width for proper overlap and coverage. Standard barn door sizes include:
- Small doors (30” x 80”): Perfect for closets, pantries, or powder rooms
- Standard doors (36” x 84”): Ideal for bedrooms, bathrooms, and standard doorways
- Large doors (42” x 84”): Great for wide openings, double closets, or room dividers
Detailed Cut Lists by Door Style
Rustic Z-Brace Door (36” x 84”)
- Face boards: 6 pieces of 1x6 pine @ 84” long
- Z-brace: 3 pieces of 1x6 pine cut at 45° angles (2 diagonals, 1 horizontal)
- Backing strips: 2 pieces of 1x4 @ 30” long
- Total board feet: Approximately 35 BF
Frame-and-Panel Door (36” x 84”)
- Stiles (vertical): 2 pieces of 1x4 @ 84” long
- Rails (horizontal): 3 pieces of 1x4 @ 28” long
- Panels: 2 pieces of 3/4” plywood @ 13.5” x 36.5”
- Panel supports: 4 pieces of 1x2 @ 13” long
- Total board feet: Approximately 28 BF
Modern Slab Door (36” x 84”)
- Core panel: 1 piece of 3/4” MDF or plywood @ 36” x 84”
- Edge banding: 14 linear feet of 1x2 pine
- Face veneer: Optional wood veneer or laminate
- Total materials: 1 sheet plus lumber
Complete Hardware Requirements
Sliding Track Hardware
- Track length: Door width + 24” minimum (6-8 foot tracks common)
- Roller hangers: 2 heavy-duty rollers rated for door weight
- Track mounting brackets: 3-4 brackets depending on track length
- Wall anchors: 6-8 lag bolts, 3” minimum length
- Floor guide: 1 adjustable floor guide with mounting screws
Door Hardware and Fasteners
- Wood screws: 2 lbs of 2.5” exterior wood screws
- Pocket screws: 50-count 1.25” pocket screws (for frame joints)
- Handle: Decorative barn door handle or pull
- Magnetic catch: For doors requiring latching
Essential Tools Required
Power Tools
- Circular saw or miter saw: For accurate crosscuts and rip cuts
- Drill/driver: 18V cordless recommended with various bits
- Orbital sander: 5” random orbit sander for smooth finish prep
- Router: For dados, grooves, and edge profiles (optional)
- Pocket hole jig: For strong, hidden frame joints
Hand Tools and Accessories
- Tape measure: 25-foot minimum
- Speed square and framing square: For marking and checking angles
- Clamps: Minimum 6 bar clamps, 36” capacity
- Chisels: 1/2” and 3/4” for fine-tuning joints
- Pencil and marking tools: For layout and cut lines
Material Cost Breakdown
Budget Option ($75-125)
- Lumber: Construction-grade pine or whitewood
- Hardware: Basic sliding track kit
- Finish: Stain and polyurethane
Mid-Range Option ($150-250)
- Lumber: Select pine or poplar boards
- Hardware: Quality sliding track with soft-close
- Finish: Primer and high-quality paint
Premium Option ($300-400)
- Lumber: Hardwood or reclaimed materials
- Hardware: Heavy-duty decorative track system
- Finish: Professional-grade stains and topcoats
Design Options and Layout: From Classic Z-Brace to Clean Modern
Choosing the right design style sets the tone for your entire project. Each barn door style offers unique aesthetic appeal and construction requirements. Consider your home’s existing decor, skill level, and available tools when selecting your preferred approach.
Rustic Z-Brace Barn Door Design
The Z-brace design represents the classic farmhouse barn door aesthetic. This style features vertical planks held together by diagonal and horizontal bracing that creates the distinctive “Z” pattern.
Design characteristics:
- Visual appeal: Raw, agricultural charm with visible wood grain and rustic hardware
- Construction method: Individual planks joined with surface-mounted bracing
- Skill level: Beginner to intermediate
- Best applications: Farmhouse kitchens, country bedrooms, rustic dens
Material options for rustic doors:
- Reclaimed barn wood: Authentic weathered appearance with natural character
- Pine planks: Affordable option that stains beautifully
- Cedar boards: Naturally weather-resistant with aromatic properties
- Rough-sawn lumber: Adds texture and visual interest
Modern Frame-and-Panel Construction
Frame-and-panel construction offers a more refined appearance suitable for contemporary and traditional homes. This method creates stronger, more stable doors with professional-looking results.
Design characteristics:
- Visual appeal: Clean lines with inset panels and precise joinery
- Construction method: Mortise and tenon or pocket screw frame construction
- Skill level: Intermediate to advanced
- Best applications: Master bedrooms, formal dining rooms, home offices
Panel options:
- Raised panels: Traditional appearance with routed edges
- Flat panels: Clean, contemporary look
- Glass inserts: Allow light transmission while maintaining privacy
- Decorative panels: Carved or molded surfaces for unique character
Contemporary Slab Doors
Modern slab doors feature clean, minimalist designs that complement contemporary home styles. These doors emphasize simplicity and often incorporate mixed materials.
Design characteristics:
- Visual appeal: Sleek, unadorned surfaces with emphasis on materials
- Construction method: Solid core or veneered panels with edge banding
- Skill level: Intermediate
- Best applications: Modern bedrooms, minimalist bathrooms, urban lofts
Single vs. double layouts and rail length
Use a 6’ rail for a single slab. Double setups work best with mirrored pieces and an 8’ (or longer) track so each panel clears when open.
Hardware Style Coordination
Your door design should complement your chosen hardware style. Consider these popular combinations:
Rustic doors pair well with:
- Black iron hardware with decorative elements
- Raw steel tracks with industrial appearance
- Antique bronze finishes for vintage appeal
Modern doors complement:
- Brushed stainless steel hardware
- Powder-coated aluminum tracks
- Sleek, minimal roller designs
Traditional doors work with:
- Oil-rubbed bronze hardware
- Decorative brass elements
- Classic wheel and track systems
Planning Your Layout
Before finalizing your design, consider these layout factors:
Wall space requirements:
- Single doors need wall space equal to door width plus 6”
- Double doors require wall space for both doors when opened
- Account for light switches, outlets, and trim work
Traffic flow patterns:
- Ensure doors don’t interfere with furniture placement
- Consider how doors will affect room functionality
- Plan for both open and closed positions
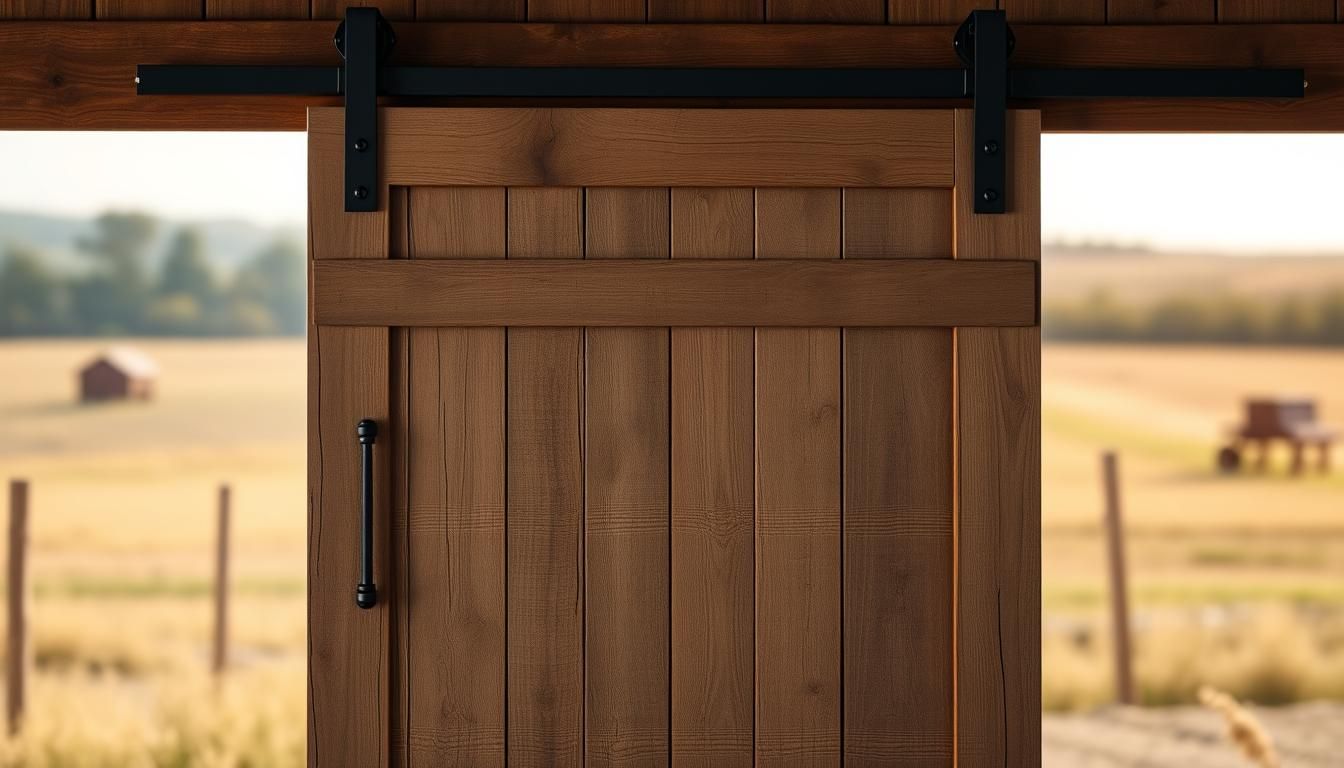
Barn Door Hardware Selection Guide
Selecting the right hardware is crucial for both function and aesthetic appeal. Quality hardware ensures smooth operation and supports the door’s weight safely over years of use. This comprehensive guide covers all hardware components needed for a professional barn door installation.
Understanding Weight Requirements
Door weight calculations: Before selecting hardware, calculate your door’s approximate weight:
- Pine Z-brace door (36” x 84”): 45-60 pounds
- Frame-and-panel door (36” x 84”): 40-55 pounds
- Solid wood door (36” x 84”): 60-80 pounds
- MDF/plywood door (36” x 84”): 50-70 pounds
Hardware weight ratings: Always choose hardware rated for 150% of your door’s actual weight. This provides a safety margin and ensures smooth operation over time.
Sliding Track Systems
Top-Mount Track Systems
Characteristics:
- Most common and reliable option
- Track mounts to wall above door opening
- Requires sturdy wall construction or backing board
- Available in lengths from 6’ to 12’
Popular styles:
- Straight track: Simple, clean appearance
- Box rail track: Industrial look with enclosed rollers
- Decorative track: Features curves or architectural details
Ceiling-Mount Track Systems
When to use:
- Limited wall space above opening
- Contemporary, minimalist appearance desired
- Higher ceilings with exposed beams
Considerations:
- Requires structural ceiling support
- More complex installation process
- Limited style options available
Roller and Hanger Hardware
Heavy-Duty Roller Systems
Ball bearing rollers: Smooth operation with minimal maintenance
- Steel construction with sealed bearings
- Weight capacity: 150-400 pounds per pair
- Adjustable height for fine-tuning
Nylon rollers: Quieter operation, suitable for lighter doors
- Polymer construction reduces noise
- Weight capacity: 75-200 pounds per pair
- Self-lubricating design
Decorative Hanger Styles
Industrial hangers:
- Black iron or steel construction
- Exposed hardware for rustic appeal
- Available with wheel or roller designs
Contemporary hangers:
- Sleek, minimal appearance
- Stainless steel or powder-coated finishes
- Hidden roller mechanisms
Track Mounting and Support Hardware
Wall-Mount Brackets
Standard brackets: Support track at stud locations
- Minimum 3 brackets for 6-8 foot tracks
- Lag screw mounting into wall studs
- Adjustable for minor leveling
Heavy-duty brackets: For heavier doors or challenging installations
- Through-bolt mounting for maximum strength
- Steel construction with reinforcement ribs
- Powder-coated finishes available
Backing Board Systems
When needed:
- Hollow walls or inconsistent stud spacing
- Distributes weight across multiple studs
- Creates level mounting surface
Materials:
- 2x8 or 2x10 dimensional lumber
- 3/4” plywood for lighter applications
- Must span minimum 3 wall studs
Door Guides and Stops
Floor Guides
Adjustable guides: Accommodate minor door variations
- Side-to-side adjustment range
- Removable for cleaning underneath
- Multiple mounting options
Low-profile guides: Minimal interference with flooring
- 1/4” height above floor
- Coordinates with door bottom clearance
- Available in matching hardware finishes
Wall-Mount Guides
Anti-jump blocks: Prevent door from lifting off track
- Mount above door on track
- Adjustable gap settings
- Essential for safety compliance
End stops: Control door travel limits
- Soft-close mechanisms available
- Prevent damage to walls and door
- Adjustable positioning
Handle and Pull Hardware
Rustic Pull Styles
Strap hinges: Traditional barn door appearance
- Decorative iron construction
- Surface-mounted design
- Various sizes and finishes available
Ring pulls: Compact, functional design
- Flush or raised mounting options
- Coordinate with track hardware finish
- Suitable for tight spaces
Modern Pull Styles
Bar pulls: Clean, contemporary lines
- Stainless steel or powder-coated finishes
- Various lengths and profiles
- Concealed mounting hardware
Flush pulls: Minimal visual impact
- Recessed into door surface
- Finger grip design
- Perfect for modern slab doors
Latch and Lock Hardware
Privacy Latches
Barrel bolt latches: Simple, effective privacy solution
- Surface-mounted operation
- Available in decorative finishes
- Manual engagement required
Magnetic latches: Automatic engagement
- Hidden installation
- Adjustable magnetic strength
- Silent operation
Security Options
Keyed locks: For applications requiring security
- Mortise or surface-mount styles
- Coordinate with interior door hardware
- Professional installation recommended
Hardware Finish Options
Protective Finishes
Powder coating: Durable, chip-resistant finish
- Available in numerous colors
- Excellent corrosion resistance
- Professional appearance
Oil-rubbed bronze: Traditional, warm appearance
- Living finish that ages naturally
- Complements rustic and traditional designs
- Requires periodic maintenance
Decorative Finishes
Brushed stainless steel: Modern, clean appearance
- Fingerprint-resistant surface
- Coordinates with contemporary fixtures
- Low maintenance requirements
Raw steel: Industrial, authentic appearance
- Natural patina development over time
- Perfect for rustic or industrial designs
- May require protective clear coat
DIY vs. Commercial Hardware Kits
Complete Hardware Kits
Advantages:
- All components included and coordinated
- Simplified ordering process
- Technical support available
- Warranty coverage
Popular manufacturers:
- Sliding Barn Door Hardware
- National Hardware
- Calhome
- HOMCOM
Custom Hardware Assembly
When to consider:
- Unique size requirements
- Specific aesthetic preferences
- Budget constraints
- Matching existing hardware
Component sourcing:
- Track: steel fabrication shops
- Rollers: industrial bearing suppliers
- Brackets: custom metalwork
- Finishing: powder coating services
Measuring, Marking, and Preparing Your Boards
Begin with a dry layout: arrange cut boards and frame pieces on a flat work surface to confirm fit and alignment. This step saves time and prevents costly re-cuts later.
Dry fit your stiles, rails, and panels before committing. Check the center line where a middle rail will sit. Make sure the top and bottom edges are straight and that every board is flush. Sand any high spots lightly so pieces meet cleanly.
!measure mark prep boards
Marking diagonals and setting angles for a snug fit
For a diagonal brace, lay the brace in place and use a straightedge to mark both ends. Many builds call for about a 15° cut. Trim the angle and test again until the brace fits tight without gaps.
- Measure the opening, add overlap, then mark final width and height on your flat surface.
- Label pieces so orientation stays consistent during glue-up and fastening.
- If you use tongue edges, make sure tongues seat fully into grooves during the dry fit.
- Pre-sand edges to remove splinters from soft pine and pre-drill where screws will go to avoid splits.
| Check | Why it matters | Quick fix |
|---|---|---|
| Center alignment | Ensures middle rail and hardware sit true | Shift pieces on bench until centered |
| Top & bottom straightness | Prevents binding on track and guides | Plane or sand edges flat |
| Tongue fit | Stops gaps and squeaks | Trim tongue or deepen groove slightly |
| Brace angle | Creates a rattle-free, tight frame | Mark with straightedge; cut ~15° then refit |
Before assembly, confirm final inches for reveals and floor clearance so the slab will clear guides and trim when hung. For an illustrated tutorial and alternate techniques, see this DIY barn door tutorial.
Step-by-Step Construction Instructions
This section provides detailed construction methods for each barn door style. Choose the approach that matches your skill level and desired aesthetic. All methods emphasize accuracy and safety to ensure professional results.
Safety Considerations Before You Begin
Personal protective equipment:
- Safety glasses for all cutting and drilling operations
- Dust mask when sanding or cutting treated lumber
- Hearing protection for power tool use
- Work gloves for handling rough lumber
Workshop safety:
- Ensure adequate ventilation, especially when finishing
- Keep work area clean and well-lit
- Secure workpieces properly before cutting
- Never rush cuts or skip safety steps
Building a Rustic Z-Brace Barn Door
This traditional design offers the classic barn door appearance with straightforward construction techniques suitable for beginners.
Step 1: Cutting the Face Boards
- Select and prepare lumber: Choose 6 pieces of 1x6 pine boards, each 84” long
- Check for defects: Inspect for knots, warping, or damage
- Mill to consistent width: Rip boards to exactly 5.5” wide for uniform appearance
- Sand face surfaces: 120-grit sandpaper to remove mill marks
Step 2: Creating the Z-Brace Pattern
- Layout the face boards: Arrange boards edge-to-edge on work surface
- Mark brace positions:
- Top diagonal: 6” from top corner to opposite bottom
- Bottom diagonal: 6” from bottom corner to opposite top
- Horizontal brace: Center of door height
- Cut brace pieces: Use 1x6 material, cutting angles with miter saw
- Test fit: Ensure braces lie flat against face boards without gaps
Step 3: Assembly Process
- Apply wood glue: Thin, even coat on brace contact areas
- Position braces: Align with layout marks, ensuring square corners
- Secure with screws: 2.5” wood screws from back side, pilot holes prevent splitting
- Check for square: Measure diagonals - they should be equal
- Clamp until cured: Allow 2-4 hours for initial set
Building a Frame-and-Panel Barn Door
This method creates a stronger, more refined door suitable for high-use applications and formal settings.
Step 1: Preparing Frame Components
- Cut stiles: 2 pieces of 1x4 lumber at 84” long
- Cut rails: 3 pieces of 1x4 lumber at 28” long (allows for tenons)
- Mill dados: 3/4” wide x 3/8” deep grooves in all frame pieces
- Create tenons: Cut 3/4” x 2.5” tenons on rail ends
Step 2: Panel Preparation
- Cut panels: 2 pieces of 3/4” plywood at 13.5” x 36.5”
- Sand panels: Progress from 120 to 220 grit for smooth finish
- Test fit: Panels should slide into frame grooves with slight clearance
- Apply edge treatment: Round over panel edges with router (optional)
Step 3: Frame Assembly
- Dry assemble: Test all joints for proper fit
- Apply glue to tenons: Avoid gluing panel grooves (allows movement)
- Assemble frame: Work systematically - bottom rail, panels, center rail, top rail
- Clamp assembly: Use cauls to distribute pressure evenly
- Check dimensions: Verify overall size and square before glue sets
Building a Modern Slab Door
Contemporary design emphasizing clean lines and minimal visual elements.
Step 1: Core Preparation
- Select core material: 3/4” MDF or hardwood plywood
- Cut to size: 36” x 84” using circular saw with fine-tooth blade
- Sand face: 150-grit to remove scratches and prepare for veneer
Step 2: Edge Banding Application
- Cut edge strips: 1x2 pine, mitered corners for clean appearance
- Apply wood glue: To both core edge and banding
- Attach with clamps: Ensure even pressure along entire edge
- Flush trim: Use router with flush-trim bit after glue dries
- Sand smooth: 180-grit to blend edge and face surfaces
Step 3: Surface Treatment Options
Veneer application:
- Apply contact cement to both surfaces
- Position veneer carefully (no repositioning possible)
- Use roller to eliminate bubbles
- Trim with sharp utility knife
Paint preparation:
- Fill any voids with wood filler
- Sand entire surface with 220-grit paper
- Apply primer designed for MDF/plywood
- Light sand between coats
Advanced Joinery Techniques
Pocket Screw Joinery
When to use: Frame-and-panel construction for strong, hidden connections
- Drill pocket holes: Use jig to ensure proper angle and depth
- Select correct screws: 1.25” fine thread for 3/4” material
- Clamp during assembly: Prevents pieces from shifting
- Plug holes: Use wooden plugs for exposed areas
Mortise and Tenon Joints
When to use: Traditional frame construction for maximum strength
- Cut mortises: Use router with edge guide or chisel by hand
- Size tenons: Should fit snugly with light mallet pressure
- Test joints: Dry fit before gluing to ensure proper alignment
- Apply glue sparingly: Excess can cause unsightly squeeze-out
Quality Control Checkpoints
Throughout Construction
- Measure twice, cut once: Double-check all measurements
- Test fit regularly: Catch problems before permanent assembly
- Keep surfaces protected: Use paper or cloth under clamps
- Work methodically: Don’t rush critical steps
Final Inspection
- Check dimensions: Door should match opening requirements
- Verify square: Diagonal measurements must be equal
- Test hardware fit: Ensure roller brackets align properly
- Surface quality: No glue residue, scratches, or defects
Common Construction Mistakes to Avoid
Material Selection Errors
- Green lumber: Can warp as it dries, causing door problems
- Inconsistent thickness: Creates uneven surfaces and poor joints
- Poor grain matching: Results in unsightly appearance
Assembly Problems
- Insufficient clamping time: Weak joints that may fail over time
- Uneven glue application: Causes weak spots and visible glue lines
- Skipping dry fits: Leads to assembly problems and poor results
Finishing Preparation
- Inadequate sanding: Shows through final finish
- Contaminated surfaces: Oil, dirt, or dust prevents proper adhesion
- Rushing between coats: Causes finish defects and poor durability
Door Assembly: Glue-Up, Fasteners, and Squaring the Frame
Set up a protected, flat assembly surface and plan your clamp order before you start. Tape or paper under the supports prevents squeeze-out from bonding the slab to the bench.
!door assembly
Work in clear steps. Spread wood glue evenly in joints or grooves, assemble the lower section first, then clamp across the width using cauls to keep the face flat.
- Use finish nails to tack outer trim so registration holds while you flip the panel.
- Drive 1”–1.25” screws from the back into a 1.5” thick slab after pre-drilling to prevent splits.
- Make sure the center rail aligns with your layout marks; check diagonals corner-to-corner for squareness.
- Fit the diagonal brace snugly, glue it, then add weight or clamps and allow ample cure time—overnight when possible.
- In softwood, recess screw heads by using a steady bit and firm pressure rather than heavy countersinks.
Work methodically—lower section, center alignment, then top—so the top door edge ends up flush and ready for finishing. This stepwise approach keeps the barn-style panel tight and stable for years of use.
Professional Finishing and Staining Techniques
The finish you choose dramatically impacts both the appearance and durability of your barn door. This comprehensive guide covers everything from surface preparation through final topcoat application, ensuring professional results that will last for years.
Surface Preparation Fundamentals
Preparation is 80% of a quality finish. Rushing this stage will show in the final result, while careful attention here ensures a beautiful, durable finish.
Initial Sanding Process
- Start with 120-grit sandpaper: Remove mill marks and surface imperfections
- Progress to 150-grit: Smooth the surface while maintaining wood texture
- Finish with 220-grit: Create ideal surface for finish adhesion
- Sand with the grain: Always follow wood grain direction to avoid scratches
- Remove all dust: Use tack cloth or compressed air between grits
Defect Repair and Filling
Wood filler application:
- Choose filler that matches your stain color (test on scrap wood)
- Apply with putty knife, slightly overfilling holes
- Allow complete cure (follow manufacturer’s timing)
- Sand flush with surrounding surface
Gap and seam treatment:
- Small gaps (under 1/16”): Use wood filler or color-matched caulk
- Larger gaps: Install thin wood strips and sand smooth
- Joint lines: Ensure tight fit during construction to minimize filling
Stain Selection and Application
Choosing the Right Stain Type
Oil-based stains:
- Advantages: Deep penetration, rich color, easier blending
- Best for: Pine, oak, and other porous woods
- Application time: Longer open time allows better blending
- Cleanup: Mineral spirits required
Water-based stains:
- Advantages: Low odor, quick dry time, eco-friendly
- Best for: Hard maple, birch, and tight-grained woods
- Application time: Fast application required
- Cleanup: Soap and water
Gel stains:
- Advantages: No drip application, excellent color control
- Best for: Vertical surfaces and blotchy woods
- Application time: Moderate working time
- Cleanup: Mineral spirits required
Stain Application Techniques
Proper application method:
- Test on scrap wood: Always test stain color and technique first
- Apply with the grain: Use brush, rag, or foam applicator
- Maintain wet edge: Work in manageable sections to avoid overlap marks
- Control penetration time: Longer contact = darker color
- Remove excess: Wipe with clean cloth following grain direction
Achieving even color:
- Pre-condition soft woods with wood conditioner
- Apply thin, even coats rather than single heavy coat
- Work in good lighting to spot color variations immediately
- Use long, smooth strokes to minimize brush marks
Paint Systems for Barn Doors
Primer Selection and Application
Oil-based primers:
- Best for: Knot sealing, stain blocking, and adhesion
- Application: Brush or spray for smooth finish
- Dry time: 4-6 hours between coats
- Topcoat compatibility: Works with oil or latex topcoats
Water-based primers:
- Best for: Quick projects, low odor applications
- Application: Brush, roller, or spray
- Dry time: 2-4 hours between coats
- Topcoat compatibility: Best with water-based topcoats
Specialty primers:
- Stain-blocking primers: For knot sealing and tannin control
- Bonding primers: For painted or glossy surfaces
- High-build primers: Fill minor surface imperfections
Paint Selection Guide
Latex paints:
- Advantages: Easy cleanup, low odor, quick dry
- Finish options: Flat, eggshell, satin, semi-gloss, gloss
- Durability: Excellent color retention, flexible film
- Best applications: Interior doors, painted finishes
Oil-based paints:
- Advantages: Smooth finish, excellent leveling
- Finish options: Satin, semi-gloss, gloss
- Durability: Hard, durable finish
- Best applications: High-wear areas, traditional appearance
Advanced Finishing Techniques
Distressing and Aging Effects
Mechanical distressing:
- Chain strikes: Create authentic wear patterns
- Sandpaper aging: Focus on edges and high-wear areas
- Wire brush texture: Emphasize wood grain
- Corner rounding: Soften sharp edges naturally
Chemical aging:
- Vinegar and steel wool solution: Creates gray weathered appearance
- Tea staining: Adds subtle aging to light woods
- Ammonia fuming: Darkens tannin-rich woods naturally
Specialty Finishes
Milk paint finish:
- Characteristics: Flat, chalky appearance with vintage appeal
- Application: Brush on thin coats, sand between if needed
- Durability: Moderate; requires topcoat for high-wear areas
- Color options: Traditional colors with authentic appearance
Chalk paint systems:
- Characteristics: Ultra-matte finish, excellent adhesion
- Application: Brush application with minimal prep
- Durability: Good with proper wax or poly topcoat
- Decorative options: Distressing and layering techniques
Room-Specific Finishing Considerations
Bathroom Applications
Moisture resistance requirements:
- Use marine-grade or bathroom-specific finishes
- Ensure complete edge sealing to prevent swelling
- Consider mold-resistant additives in primer
- Apply extra topcoat layers for durability
Kitchen Applications
Grease and stain resistance:
- Semi-gloss or gloss finishes for easy cleaning
- Oil-based topcoats for maximum durability
- Consider catalyzed lacquer for commercial-grade protection
Maintenance and Touch-Up Procedures
Routine Maintenance
Annual inspection checklist:
- Check for finish wear at hardware contact points
- Inspect for moisture damage or swelling
- Clean regularly with appropriate cleaners
- Touch up minor scratches promptly
Cleaning methods:
- Painted surfaces: Mild soap and water, avoid abrasives
- Stained surfaces: Wood cleaner appropriate for finish type
- Hardware: Match cleaning method to finish type
Touch-Up Techniques
Minor scratch repair:
- Clean affected area thoroughly
- Sand lightly if necessary to feather edges
- Apply matching stain or paint in thin coats
- Blend edges carefully to match surrounding finish
- Apply topcoat to match existing sheen level
When to refinish:
- Finish wear covers more than 25% of surface
- Multiple deep scratches or gouges present
- Color has faded significantly
- Moisture damage has occurred
Troubleshooting Common Finishing Problems
Stain Issues
Blotchy appearance:
- Cause: Uneven wood density or inadequate surface prep
- Solution: Sand back, apply pre-stain conditioner, re-stain
Color too light:
- Cause: Insufficient penetration time or thin application
- Solution: Apply additional stain coat with longer penetration time
Color too dark:
- Cause: Over-penetration or wrong stain choice
- Solution: Sand back partially and apply lighter stain or bleach
Paint Issues
Brush marks visible:
- Cause: Wrong brush type or poor application technique
- Solution: Sand smooth, use quality brush, maintain wet edge
Poor adhesion:
- Cause: Inadequate surface prep or contamination
- Solution: Sand to bare wood, clean thoroughly, apply appropriate primer
Room-Specific Barn Door Applications
Sliding barn doors work beautifully throughout the home, but each room presents unique requirements and opportunities. This section provides specific guidance for optimizing barn door design, installation, and functionality in different living spaces.
Master Bedroom Applications
Closet doors: The most popular bedroom application, replacing traditional hinged closet doors.
Design considerations:
- Size requirements: Typically 36-48” wide for single closets, 60-96” for walk-ins
- Style preferences: Frame-and-panel doors for formal bedrooms, rustic styles for casual settings
- Hardware selection: Soft-close mechanisms prevent slamming, oil-rubbed bronze complements traditional decor
Installation specifics:
- Wall space: Ensure adequate wall space (door width + 6”) beside closet opening
- Floor clearance: 1/2” minimum to clear carpet or rugs
- Lighting integration: Consider how door position affects closet lighting
Privacy considerations:
- Sound dampening: Add weatherstripping around door perimeter
- Light blocking: Install door sweep at bottom edge
- Locking options: Magnetic or barrel bolt latches for security
Kitchen and Pantry Installations
Pantry doors: Conceals storage areas while maintaining easy access.
Functional requirements:
- Heavy-duty hardware: Kitchen doors see frequent use requiring robust components
- Easy cleaning finishes: Semi-gloss or gloss paint for grease resistance
- Width considerations: 24-30” doors work well for standard pantries
Style integration:
- Match cabinetry: Coordinate door style with kitchen cabinet design
- Hardware coordination: Match handles and hinges to kitchen hardware
- Color schemes: Complement overall kitchen color palette
Special considerations:
- Ventilation: Ensure adequate air circulation around food storage
- Accessibility: Position handle at comfortable height for all users
- Door weight: Consider contents weight when selecting hardware ratings
Bathroom Applications
Ensuite privacy: Separate toilet areas or entire bathroom sections.
Moisture management:
- Finish selection: Marine-grade finishes resist humidity damage
- Edge sealing: Complete sealing prevents moisture penetration and swelling
- Ventilation: Maintain adequate air circulation around door
Size and clearance:
- Typical dimensions: 30-32” wide for toilet area separation
- Floor clearance: 3/4” minimum to clear tile and threshold
- Swing clearance: No swing radius required unlike traditional doors
Privacy and function:
- Frosted glass panels: Maintain light while providing privacy
- Magnetic latches: Automatic engagement for privacy
- Soft-close hardware: Prevents slamming in quiet morning routines
Home Office and Study Spaces
Room separation: Create defined work areas in open floor plans.
Acoustic considerations:
- Sound reduction: Solid-core doors or added insulation reduce noise transmission
- Seal installation: Weatherstripping around perimeter improves sound dampening
- Door weight: Heavier doors provide better sound insulation
Technology integration:
- Cable management: Plan for power and data cables passing through or around door area
- Lighting zones: Consider how door position affects task lighting
- Climate control: Ensure adequate HVAC circulation to work area
Laundry Room Solutions
Appliance concealment: Hide washer/dryer units when not in use.
Practical considerations:
- Ventilation requirements: Never block dryer venting with door installation
- Access needs: Ensure full appliance access for maintenance
- Moisture resistance: Use appropriate finishes for humidity exposure
Size requirements:
- Standard openings: 60-72” wide openings accommodate side-by-side appliances
- Clearance needs: Consider appliance door swing and loading requirements
- Track length: Plan for doors to clear opening completely when open
Living Room and Entertainment Areas
Entertainment center doors: Conceal TV and media equipment when desired.
Design integration:
- Scale considerations: Large doors require substantial hardware and wall support
- Style coordination: Match door design to room’s architectural elements
- Color selection: Choose finishes that complement furniture and decor
Functional aspects:
- Cable management: Plan for TV cables and power cords
- Remote accessibility: Ensure door position doesn’t interfere with remote control function
- Heat dissipation: Allow adequate ventilation for electronic equipment
Basement and Utility Applications
Workshop separation: Separate work areas from finished basement space.
Durability requirements:
- Construction grade materials: Higher moisture and temperature variations require robust construction
- Heavy-duty hardware: Industrial applications benefit from commercial-grade components
- Maintenance access: Ensure easy access to utilities behind doors
Safety considerations:
- Emergency access: Never block emergency exits or utilities
- Fire ratings: Consider fire-rated doors for furnace room applications
- Code compliance: Verify local building codes for basement door requirements
Multi-Functional Spaces
Room dividers: Create flexible space division in open floor plans.
Design flexibility:
- Reversible finishes: Different finishes on each side complement adjacent rooms
- Modular systems: Multiple doors can create variable opening sizes
- Ceiling mounting: Alternative to wall mounting in some applications
Structural considerations:
- Load distribution: Ensure adequate support for door weight
- Ceiling attachment: May require additional framing or support
- Multiple door coordination: Synchronize multiple door movements
Installation Challenges by Room Type
Low Ceilings
Solutions:
- Ceiling-mount tracks: Maximize available height
- Reduced door height: Maintain proportions while fitting space constraints
- Header design: Minimize track and header visual impact
Uneven Floors
Solutions:
- Adjustable floor guides: Accommodate minor floor variations
- Door bottom modification: Custom scribing to match floor contours
- Track shimming: Level track despite uneven ceiling or wall
Limited Wall Space
Solutions:
- Corner installations: Utilize corner wall space for door parking
- Pocket door hybrids: Combine sliding and pocket door concepts
- Bifold alternatives: Consider bifold barn door designs for tight spaces
Room-Specific Maintenance
High-Moisture Rooms (Bathrooms, Laundries)
- Monthly inspections: Check for finish damage or swelling
- Annual treatment: Reapply protective coatings as needed
- Hardware maintenance: Lubricate rollers and tracks more frequently
High-Traffic Areas (Kitchens, Entryways)
- Weekly cleaning: Remove grease, fingerprints, and general soiling
- Quarterly hardware checks: Verify all fasteners remain tight
- Annual finish inspection: Touch up wear points promptly
Climate-Controlled Spaces (Bedrooms, Offices)
- Seasonal adjustments: Check for seasonal wood movement
- Annual maintenance: Light cleaning and lubrication sufficient
- Finish longevity: Expect longer finish life in stable environments
Hardware and Track: DIY Fabrication vs. Off-the-Shelf Kits
Deciding between a kit and a custom rail starts with how you plan to mount the rail to the wall. A clear mounting plan saves time and keeps the finished opening reliable.
Backing and attachment basics: For a DIY rail, mount a 75” 1x4 backing board into studs marked at 16” on center. Use 1.25” dowel spacers to set the rail off the wall so the panel clears trim and casing. Drill matching holes and fasten with 4” lag bolts through spacers into studs for solid support.
- Cut a 2” flat bar for the track and drill carriage-bolt holes in wheel brackets. Secure wheels with carriage bolts and washers, then attach brackets to the rail.
- Add 2” angle-steel end caps and fixed stops after a dry fit to set the maximum open length and prevent roll-off.
- Use a simple floor guide or low-profile channel to keep the slab tracking true at the bottom.
Buy or build? Off-the-shelf kits in 6’ or 8’ save time and give proven reliability. Brands like Caldwell Company offer ready-made track and wheel sets. If you prefer control or a custom length, fabricating the rail works—expect more drilling, finishing, and alignment time. Paint or powder-coat brackets and track black for a classic, durable finish.
Installation, Adjustments, and Finishing Touches
Begin installation by securing a solid backing to studs so the rail and hardware sit true and steady.
Mounting the backing board and rail level to the wall
Find studs and fasten the backing board level with decking screws so the load spreads evenly. Then align the pre-drilled rail and run 4” lag bolts through spacers into studs.
Make sure the rail is plumb and level before you tighten every bolt. Proper spacing keeps the assembly rigid and prevents quick adjustments later.
Hanging the slab, setting stops, and adding the handle
Dry-fit the slab on the wheels and roll it back and forth. Check that the panel clears trim and baseboard and gives full coverage over the opening.
Set end stops so the slab opens wide enough without exposing casing and so it closes fully for privacy. Install a decorative handle at a comfortable height and confirm screw lengths won’t pierce the opposite face.
Troubleshooting sway, clearance, and floor guides
Add a low-profile floor guide to eliminate sway. Align the guide with the bottom edge so it works with rugs and thresholds. A simple channel or door guide works well.
If you notice binding, re-check rail level, spacer alignment, and wheel bracket tightness. Small tweaks to bracket positions or spacer lengths usually fix uneven rolling.
| Task | Common issue | Quick fix |
|---|---|---|
| Backing fastened to wall | Loose or uneven | Retighten decking screws into studs; add shims |
| Rail bolted through holes | Rail out of level | Loosen bolts, shim spacers, re-level then retighten |
| Slab travel | Rubbing trim | Adjust wheel bracket or add thin felt to casing |
| Bottom sway | Door drifts | Install guide aligned with bottom edge |
Final step: snug all bolts, confirm hole alignment, and wipe the face and hardware for a crisp finish. If you want soft-close, follow the kit instructions and set activation points so the sliding barn door catches reliably at each end of travel.
Comprehensive Troubleshooting and Maintenance Guide
Even well-built barn doors can develop issues over time. This section provides systematic approaches to diagnosing and fixing common problems, plus preventive maintenance schedules to keep your doors functioning smoothly for years.
Common Installation Problems and Solutions
Track and Hardware Issues
Door won’t slide smoothly:
- Cause: Misaligned track, debris in track, or inadequate lubrication
- Diagnosis: Check track for level, inspect rollers for damage, look for obstructions
- Solution: Re-level track, clean thoroughly, lubricate rollers with appropriate grease
Door jumps off track:
- Cause: Inadequate anti-jump blocks, excessive door swing, or improper roller adjustment
- Diagnosis: Check anti-jump block positioning and roller height adjustment
- Solution: Install or adjust anti-jump blocks, verify roller brackets are properly secured
Hardware becomes loose over time:
- Cause: Inadequate initial tightening, wood movement, or excessive vibration
- Diagnosis: Systematic check of all fasteners and mounting points
- Solution: Retighten all hardware, consider thread-locking compound on critical fasteners
Door Fit and Alignment Problems
Door doesn’t close completely:
- Cause: Stop blocks positioned incorrectly or door warping
- Diagnosis: Check stop block position and door flatness with straightedge
- Solution: Adjust stop blocks or plane door edges if warping is minor
Gap appears along door edges:
- Cause: House settling, improper initial fitting, or seasonal wood movement
- Diagnosis: Measure gap consistency and check house for settling signs
- Solution: Install trim strips to cover gaps or adjust door size if excessive
Door binds at top or bottom:
- Cause: Track not level, door not square, or rollers improperly adjusted
- Diagnosis: Use level on track and square on door corners
- Solution: Re-level track, adjust roller brackets, or trim door if necessary
Seasonal Maintenance Schedule
Monthly Inspections (High-Use Doors)
- Visual inspection: Check for loose hardware, finish damage, or door warping
- Operation test: Ensure smooth sliding action and proper closure
- Hardware check: Verify all bolts and screws remain tight
- Track cleaning: Remove dust, debris, or lint accumulation
Quarterly Maintenance
- Deep cleaning: Clean door surface with appropriate cleaner for finish type
- Hardware lubrication: Apply recommended lubricant to rollers and pivot points
- Adjustment check: Verify door alignment and adjust if necessary
- Stop block inspection: Ensure proper function and positioning
Annual Comprehensive Service
- Complete disassembly: Remove door from track for thorough inspection
- Hardware replacement: Replace any worn rollers, brackets, or fasteners
- Finish touch-up: Sand and refinish any damaged areas
- Track inspection: Check for wear, damage, or mounting problems
Specific Problem Diagnostics
Door Operation Issues
Door is difficult to move:
- Check track cleanliness: Remove all debris and clean with degreaser
- Inspect rollers: Look for flat spots, damage, or inadequate lubrication
- Verify track alignment: Use level to confirm track is straight and true
- Test door weight distribution: Ensure even weight distribution across rollers
Door won’t stay closed:
- Check floor guide alignment: Ensure guide properly captures door bottom
- Inspect magnetic latches: Clean and adjust magnetic catch if equipped
- Verify track level: Slight downward slope toward closed position helps
- Check stop block positioning: Ensure adequate contact with door
Door swings away from wall:
- Install or adjust floor guide: Properly positioned guide controls bottom edge
- Check roller adjustment: Verify rollers are properly seated in track
- Inspect track mounting: Ensure track is securely fastened to wall
- Add anti-sway brackets: Consider additional hardware for problem doors
Finish and Appearance Problems
Paint or stain is peeling:
- Cause: Inadequate surface preparation or moisture exposure
- Assessment: Determine extent of damage and underlying cause
- Repair: Sand affected areas, treat with appropriate primer, refinish
Wood shows signs of warping:
- Cause: Moisture exposure, inadequate sealing, or natural wood movement
- Assessment: Measure degree of warp with straightedge
- Repair: Minor warping can be corrected with moisture treatment and weight
Hardware shows rust or corrosion:
- Cause: Moisture exposure or inadequate protective finish
- Assessment: Determine if hardware can be restored or needs replacement
- Repair: Sand, treat with rust converter, and apply protective coating
Preventive Maintenance Best Practices
Environmental Controls
- Humidity management: Maintain consistent indoor humidity (30-50%)
- Temperature stability: Avoid extreme temperature fluctuations
- Ventilation: Ensure adequate air circulation around doors
- Moisture protection: Address any leaks or condensation issues promptly
Usage Guidelines
- Gentle operation: Avoid slamming or forcing doors
- Weight limits: Don’t hang items on doors or exceed hardware ratings
- Regular cleaning: Clean doors regularly with appropriate products
- Immediate repairs: Address small problems before they become major issues
Long-Term Care Strategies
- Finish maintenance: Reapply protective finishes every 3-5 years
- Hardware upgrades: Replace with higher-quality components when needed
- Documentation: Keep records of maintenance and adjustments
- Professional inspection: Consider annual professional assessment for critical applications
When to Call a Professional
Structural Issues
- Sagging track: Indicates possible structural problems
- Wall damage: Cracks or movement around mounting points
- Door weight problems: Excessive weight causing hardware failure
Safety Concerns
- Hardware failure: Any component failure that could cause injury
- Electrical conflicts: Doors interfering with electrical systems
- Code compliance: Questions about building code requirements
Complex Repairs
- Major realignment: Significant track or door adjustment needs
- Custom modifications: Alterations requiring specialized skills
- Matching existing work: Repairs that must match existing craftsmanship
Replacement Parts and Upgrades
Common Replacement Parts
- Rollers and bearings: Most common wear items
- Track sections: For damaged or worn track components
- Mounting hardware: Bolts, brackets, and spacers
- Floor guides: Adjustable guides for different floor types
Upgrade Opportunities
- Soft-close mechanisms: Add convenience and reduce wear
- Better finishes: Upgrade to more durable coating systems
- Improved hardware: Replace with commercial-grade components
- Enhanced security: Add locking mechanisms as needed
Sourcing Replacement Parts
- Original manufacturer: Best compatibility with existing hardware
- Generic suppliers: Often less expensive but verify compatibility
- Specialty retailers: Focus on barn door hardware specifically
- Local fabrication: Custom parts for unique applications
Conclusion
, A final sweep of measurements and a patient finish turn a good build into a great one.
Take a quick checklist: verify width and clearances, test the track and hardware, and confirm floor guide alignment. Tighten bolts and screws, and make minor bracket tweaks so the panel runs true.
Finish matters. Spend a little extra time on sanding, knot sealing with primer, and a quality topcoat. Use wood glue and pre-drilled screws at key joints for strength in pine or whitewood pieces.
You now have the confidence to build doors that fit style and budget. Keep this tutorial for future projects and reuse the same step order to cut time on repeat builds. Enjoy your new handle, guide, and a door that works beautifully every day.
FAQ
What basic materials do I need to build a sliding barn door for a standard interior opening?
You’ll need dimensional lumber (common choices are pine or poplar), boards for the face and backing, a rail/track kit, rollers, door guides, wood glue, screws, wood filler, sandpaper, primer, and paint or stain. Include spacers and lag bolts to secure the rail to studs. Match material thickness to your cut list and doorway dimensions.
How do I determine the correct door size and track length?
Measure your doorway width and height, then add 1½–2 inches to the width for full coverage and overlap. For track length, allow enough room for the door to clear the opening when fully open—typically 1½ times the door width for a single door; double doors need track equal to the combined width of both leaves plus clearance.
Should I use alternating 1x8/1x6 boards or full tongue-and-groove panels?
Alternating boards give a rustic, textured look and are easier to source. Tongue-and-groove panels provide a clean, stable surface with fewer gaps and less finishing work. Choose based on the style you want and your tolerance for joinery work.
What’s the best way to join stiles, rails, and panels so the door stays square?
Dry-fit all components first, then assemble with wood glue and clamps. Use pocket screws or countersunk screws from the back for reinforcement. Add a center rail or diagonal brace to distribute weight and prevent racking while the glue cures.
How deep should dados or grooves be for panel capture?
For 3/4-inch stock panels, cut a 3/8- to 1/2-inch-deep groove so the panel can float without binding. A 3/4-inch groove is common when using full-thickness material; confirm with your panel thickness and allow for seasonal movement.
How do I prevent screw heads and knots from bleeding through paint?
Seal knots with a knot-sealing primer, then fill screw holes with wood filler. Sand smooth, apply a stain-blocking primer, and finish with two coats of quality paint or a topcoat for stain. This minimizes bleed-through and ensures an even finish.
Can I make my own rail and rollers, or should I buy a kit?
You can fabricate a rail and wheel brackets if you have metalworking skills and tools, but off-the-shelf kits from brands like Horton or Johnson Hardware offer tested reliability and easier installation. Consider cost, time, and safety when deciding.
How do I mount the rail so it stays level and secure?
Fasten a backing board to the wall, locating studs, and shim as needed to get a level surface. Attach the rail to that backing board with lag bolts through the rail’s mounting holes into studs. Double-check level before final tightening.
What spacing should I allow between the bottom of the door and the floor?
Leave about 1/2 to 3/4 inch clearance at the bottom to clear flooring and allow for a floor guide. Adjust based on baseboard height and any threshold. The gap helps prevent scraping and allows for small floor irregularities.
How do I keep the door from swaying or bouncing during use?
Install top and bottom guides to control lateral movement. Use anti-jump blocks on the rail or a floor guide that captures the door’s bottom edge. Properly sized rollers and a well-secured rail also reduce sway.
What tools should I have on hand for cutting and joinery?
Essential tools include a circular saw or table saw for ripping and crosscutting, a router or table for grooves/dados, a drill with bits for pilot holes, clamps, a tape measure, and sanders. A pocket-hole jig is handy for hidden joinery.
How do I handle knots and soft spots in pine to avoid splits when driving screws?
Pre-drill pilot holes slightly smaller than the screw shank. Use wood glue plus screws for strength. Consider choosing quieter, denser boards for critical areas like rails and stiles to minimize splitting and movement.
What finish options work best for a clean modern look versus a rustic look?
For a clean modern look, use smooth tongue-and-groove panels, a good knot sealer, primer, and high-quality paint in a matte or satin finish. For rustic, embrace texture with alternating boards, a light stain or lime wash, and distressed sanding before sealing.
How much time should I budget for a single-door project from cutting to hanging?
Expect 1–2 weekends for a typical single-leaf build: one day for cutting and joinery, a day for glue-up and clamping, one day for prep and finish coats, and a half-day for mounting hardware and adjustments. Drying times can extend the schedule.
Are there safety tips for drilling into walls and attaching heavy hardware?
Always locate studs and avoid wiring or plumbing when drilling. Wear eye and ear protection, and use proper fasteners rated for your door’s weight. If unsure, consult a licensed contractor for secure rail installation.
What are common troubleshooting fixes if the door drags or binds?
Check for an out-of-level rail, loose rollers, or floor obstructions. Verify the door is square and shims behind the backing board are uniform. Adjust roller height, tighten fasteners, and trim a small amount from the bottom edge if necessary.
Can I add a handle and latch for privacy on an interior door?
Yes. Choose flush or surface-mounted hardware designed for sliding applications. Mortise-style pulls and magnetic or barrel bolt latches work well. Ensure the latch aligns with the strike plate or wall-mounted catch when the door is closed.
What’s the weight limit for sliding barn door hardware?
Most residential barn door hardware is rated for 150-400 pounds per door. Heavy-duty commercial systems can support up to 800 pounds. Always choose hardware rated for at least 150% of your door’s actual weight to ensure smooth operation and safety.
How do I calculate the total cost for a DIY barn door project?
Budget $75-125 for basic construction using pine lumber and standard hardware. Mid-range projects with quality materials run $150-250. Premium builds with hardwood and decorative hardware can reach $300-400. Add 10-15% for miscellaneous supplies and unexpected needs.
What’s the difference between bypass and single sliding barn doors?
Single sliding doors slide to one side completely, requiring wall space equal to the door width plus clearance. Bypass doors use two doors that slide past each other on parallel tracks, allowing partial access when one door is open while requiring less wall space.
Can I install barn doors on angled or vaulted ceilings?
Yes, but it requires custom brackets and track mounting. The track must remain level while accommodating the ceiling angle. Consider ceiling-mounted tracks with adjustable brackets, or install a level mounting board between angled ceiling and track.
How do I match barn door style to my home’s existing architecture?
For traditional homes, choose frame-and-panel doors with classic proportions. Modern homes work well with slab doors and minimal hardware. Rustic or farmhouse styles suit Z-brace doors with decorative hardware. Consider existing trim profiles, door proportions, and hardware finishes for cohesive design.
What’s the best wood species for DIY barn doors?
Pine offers affordability and easy workability but may dent easily. Poplar provides smooth grain and paint-friendly surface. Oak gives durability and prominent grain for staining. Cedar offers natural moisture resistance for humid areas. Reclaimed wood adds character but may require extra preparation.
How do I ensure my barn door meets building codes?
Most interior barn doors don’t require permits, but check local codes for specific applications. Ensure adequate egress if the door blocks an exit route. Fire-rated doors may be required for certain applications. Consult local building officials for commercial or multi-family installations.
Can I convert an existing hinged door to a sliding barn door?
Yes, if the door is solid and in good condition. You’ll need to add mounting points for roller brackets and may need to adjust the door’s width or height. Hollow-core doors typically aren’t suitable due to insufficient strength for mounting hardware.
What maintenance does barn door hardware require?
Monthly: Clean tracks and lubricate rollers if needed. Quarterly: Check all fasteners and adjust as necessary. Annually: Complete disassembly for thorough cleaning and inspection. Use appropriate lubricants (white lithium grease for rollers, light oil for pivot points).
How do I soundproof a sliding barn door?
Add weatherstripping around the door perimeter, install a door sweep at the bottom, use solid-core construction or add mass-loaded vinyl, and ensure proper fit with minimal gaps. Consider double-door systems with air gap between for maximum sound reduction.
Can barn doors be automated for remote control operation?
Yes, motorized barn door operators are available for residential use. They require electrical power and control systems. Most systems include safety features like obstacle detection and manual release. Professional installation is recommended for motorized systems.
What’s the minimum ceiling height needed for barn door installation?
Standard installations need 8-foot minimum ceiling height. The door height plus track height plus mounting clearance determines total requirement. Low-ceiling applications may use ceiling-mounted tracks or reduced-height doors to fit available space.
How do I handle electrical switches or outlets near the door opening?
Plan door travel to avoid covering switches when open. Relocate electrical components if necessary before installation. Consider wireless switches or extension devices if relocation isn’t practical. Never mount track hardware directly over electrical boxes.
What’s the difference between ball bearing and nylon rollers?
Ball bearing rollers offer smooth operation and long life but may be noisier. Nylon rollers provide quiet operation and self-lubrication but have lower weight capacity and shorter lifespan. Choose based on door weight, usage frequency, and noise sensitivity.
Can I use barn doors in high-moisture areas like bathrooms?
Yes, with proper material selection and finishing. Use marine-grade finishes, ensure complete edge sealing, provide adequate ventilation, and choose corrosion-resistant hardware. Consider synthetic materials or cedar for highest moisture resistance.
How do I repair scratches or dents in a finished barn door?
For minor scratches: Clean the area, sand lightly, apply matching stain or paint in thin coats. For dents: Try steam method (damp cloth and iron) to raise grain, then sand and refinish. Deep damage may require wood filler, sanding, and complete refinishing of affected area.
What accessories can enhance barn door functionality?
Soft-close mechanisms prevent slamming, magnetic latches provide hands-free closure, decorative handles improve appearance and function, floor guides reduce sway, and LED accent lighting can highlight the door as a design feature.
How do I determine wall strength for heavy barn door installation?
Locate wall studs (16” or 24” on center), check stud size (2x4 minimum for lightweight doors, 2x6 preferred for heavy doors), verify wall construction (drywall on studs vs. masonry), and consider adding blocking between studs for extra support if needed.
Can children safely operate sliding barn doors?
Yes, with proper hardware selection and installation. Choose handles at appropriate heights, ensure smooth operation requiring minimal force, install safety devices like soft-close mechanisms, and teach proper operation techniques. Avoid heavy doors in children’s areas.
What’s the lifespan of a well-built barn door?
With quality materials and proper maintenance, barn doors can last 20-30 years or more. Hardware typically needs replacement every 10-15 years depending on usage. The wood door itself can last indefinitely with periodic refinishing and minor repairs.
How do I troubleshoot uneven door gaps?
Check door squareness with measuring diagonals, verify track level and mounting, inspect roller adjustment and wear, examine door for warping or damage, and adjust stop blocks and guides. Minor adjustments can often correct gap issues without major repairs.
Can I paint over a previously stained barn door?
Yes, but proper preparation is essential. Sand to create adhesion surface, apply appropriate primer (oil-based for stain blocking), use high-quality paint for durability. Test adhesion in inconspicuous area first. Complete preparation is key to lasting results.
What’s the ideal door-to-wall gap for sliding barn doors?
Maintain 1/2” to 3/4” gap between door and wall when closed. This allows for seasonal wood movement, provides clearance for trim and baseboards, prevents binding, and accommodates minor installation variations. Adjust spacers during installation to achieve proper gap.
How do I match new barn door hardware to existing home hardware?
Note finish types (oil-rubbed bronze, brushed nickel, etc.), observe style characteristics (traditional, modern, rustic), coordinate with existing door handles and cabinet hardware, and consider architectural period of home. Many manufacturers offer coordinating product lines across different hardware types.